

Tabella dei Contenuti
Requisiti tecnici Magento
La traduzione automatica neurale da utilizzare con Magento richiede l'uso dello script PHP (scaricabile qui sotto). Per installare lo Linguise , sono necessari i seguenti requisiti:
- Esegui PHP 7+
- Server Apache, LiteSpeed, NGINX, IIS
- Attiva la riscrittura dell'URL tramite la configurazione Magento
- Magento 2+
- MagentoLa cartella principale di/pub", assicurati di installare Linguise all'interno di questa cartella.
Genera la chiave API
Dopo aver effettuato la connessione alla Linguise dashboard, dovrai prima configurare un nuovo dominio e salvarne le impostazioni per ottenere la chiave API.
La chiave API è ciò che serve per attivare la traduzione sul tuo sito web Magento . In pratica, la chiave API verificherà quale lingua è attivata su quale dominio e consentirà la generazione delle pagine di traduzione neurale.
Copia la chiave API e conservala negli appunti.
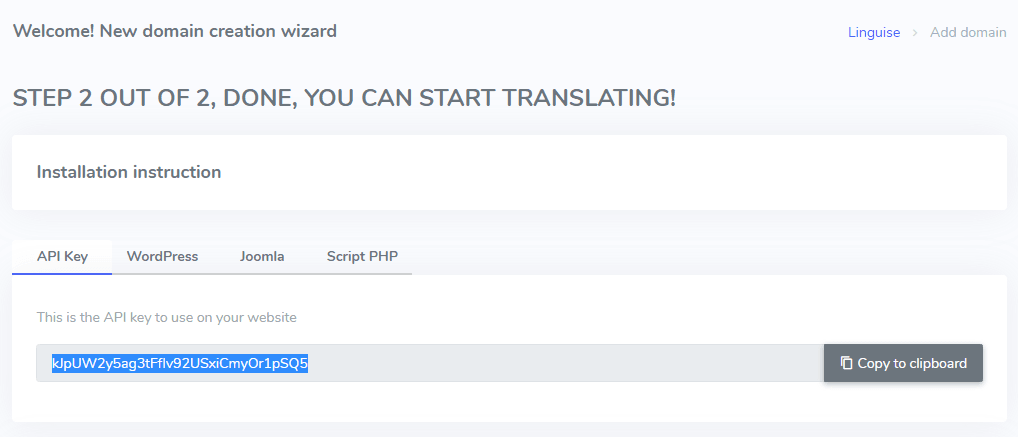
Quindi cliccando sulla scheda “Script PHP” otterrete le istruzioni di installazione che seguiremo qui nel dettaglio.
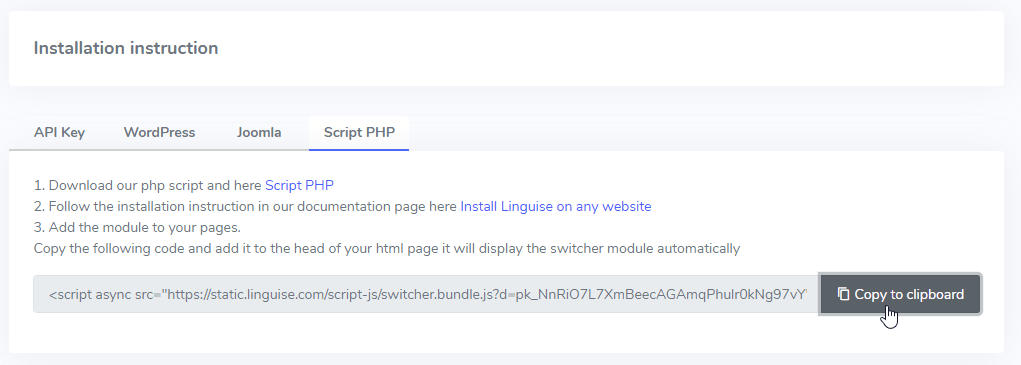
Carica e collega lo script di traduzione Linguise
Lo script di traduzione Linguise deve essere caricato sul server su cui è installato Magento :
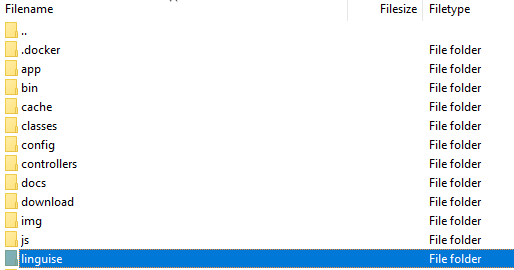
Dopo aver scaricato lo script, decomprimilo e caricalo nella cartella principale in cui è installato il CMS.
- Assicurati che si trovi nella directory principale del tuo sito web (dove Magento , di default nella /pub cartella
- Assicurati che la cartella mantenga il suo nome predefinito "linguise".
Come accedere all'interfaccia dello script Linguise ?
Dopo aver completato l' Linguise , puoi accedere alla dashboard visitando il tuo sito web con il seguente formato URL:
https://www.dominio.com/linguise
Cambia l'indirizzo del dominio in base all'indirizzo del tuo sito web*
Assicurati che Linguise abbia i permessi di lettura e scrittura appropriati*
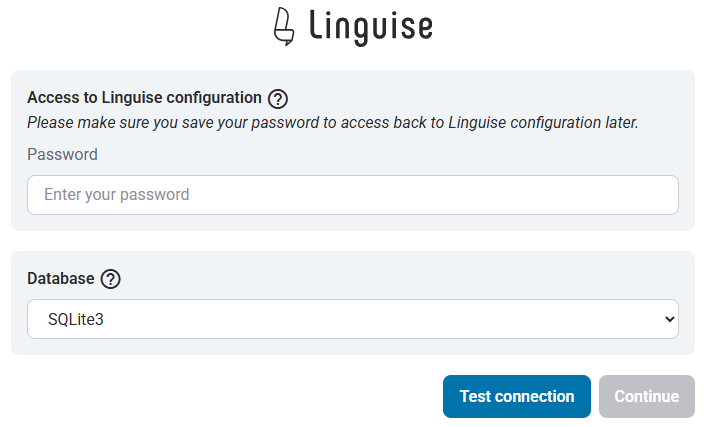
Imposta password e connessione al database
Una volta effettuato l'accesso all'interfaccia dello script, verrà visualizzata una schermata di configurazione in cui è possibile creare una password e connettersi al database preferito.
Puoi:
- Imposta una password che sarà necessaria per i futuri accessi a questa interfaccia.
- Scegli il tipo di database: MySQL o SQLite, a seconda della tua configurazione e delle tue preferenze.
Questa configurazione iniziale garantisce un accesso sicuro e consente di configurare lo script in base al proprio ambiente.
Connessione al database MySQL
Se si sceglie MySQL, verrà visualizzata un'interfaccia diversa che richiederà i seguenti dettagli di connessione dei campi di configurazione MySQL riportati di seguito:
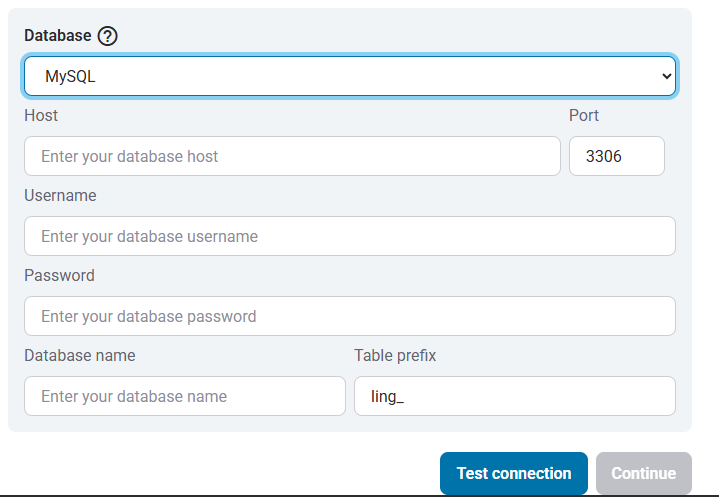
Assicurati che le informazioni siano corrette per stabilire una connessione corretta al tuo database MySQL.
MySQL vs SQLite: qual è la differenza?
Sia MySQL che SQLite sono sistemi di database molto diffusi, utilizzati per archiviare e gestire dati per siti web e applicazioni. Tuttavia, sono progettati per casi d'uso diversi e presentano alcune differenze fondamentali:
| Caratteristica | SQLite | MySQL |
|---|---|---|
| Impostare | Molto semplice (è richiesta l'installazione di SQLite) | Richiede la configurazione del server |
| Archiviazione | fila indiana | Gestito dal server MySQL |
| Prestazioni | Ottimo per app su piccola scala | Ideale per sistemi di grandi dimensioni e ad alto traffico |
| Caso d'uso | Applicazioni locali, test, piccoli siti | Applicazioni web, eCommerce, sistemi aziendali |
Interfaccia dello script Linguise : configurazione per la piattaforma PHP
La dashboard di traduzione Linguise , precedentemente disponibile solo per Joomla e WordPress, ora estende il supporto a PHP e ad altre piattaforme. Questo aggiornamento consente agli utenti di configurare senza problemi le impostazioni della lingua, come le opzioni di visualizzazione, gli stili dei flag e la personalizzazione dell'aspetto, direttamente da un'interfaccia unificata, indipendentemente dal CMS o dal framework in uso.
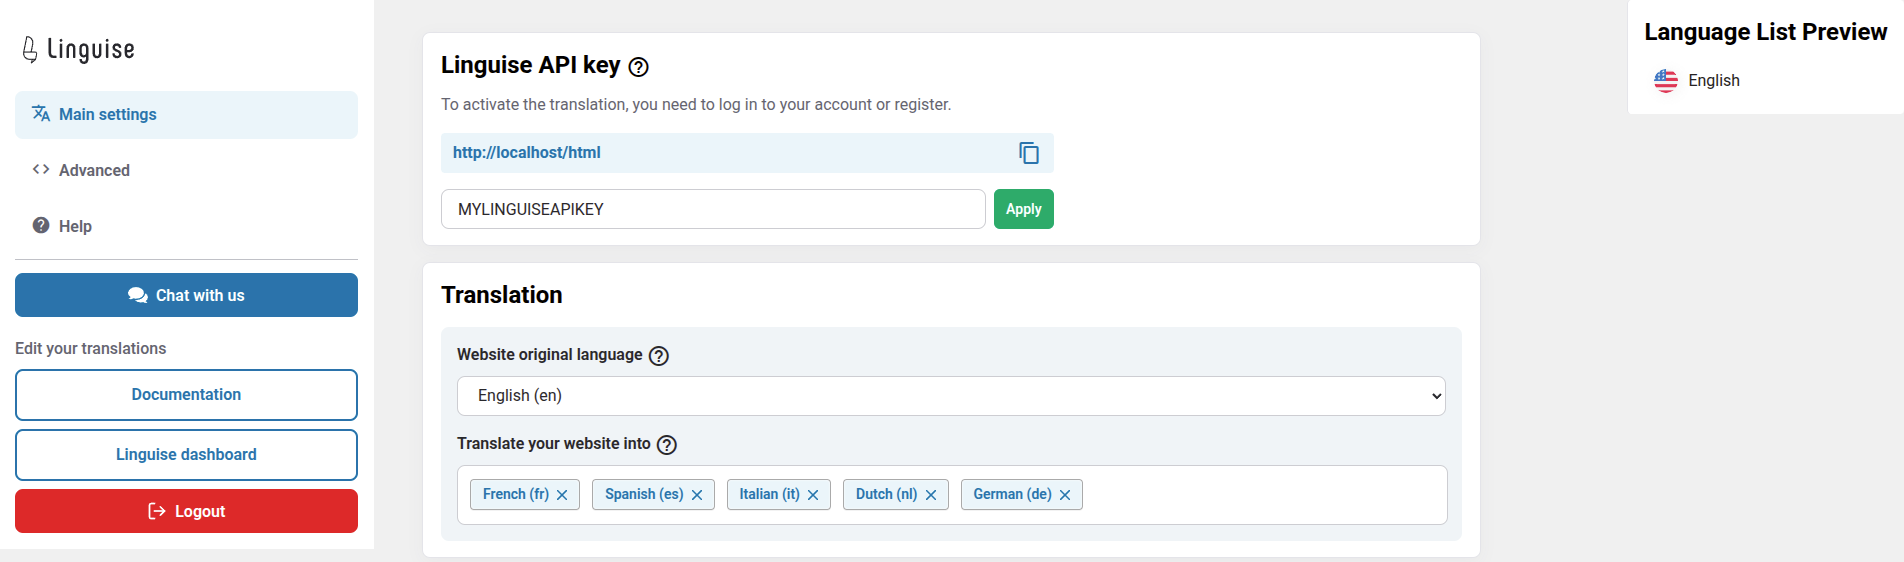
Gli amministratori possono gestire le impostazioni Linguise in modo più efficiente, con funzionalità coerenti come popup di selezione della lingua, effetti ombra e varianti di scelta delle bandiere specifiche per regione. La dashboard mantiene il suo design intuitivo, offrendo al contempo una maggiore compatibilità con diversi ambienti web.
Configurazione Magento aggiuntiva
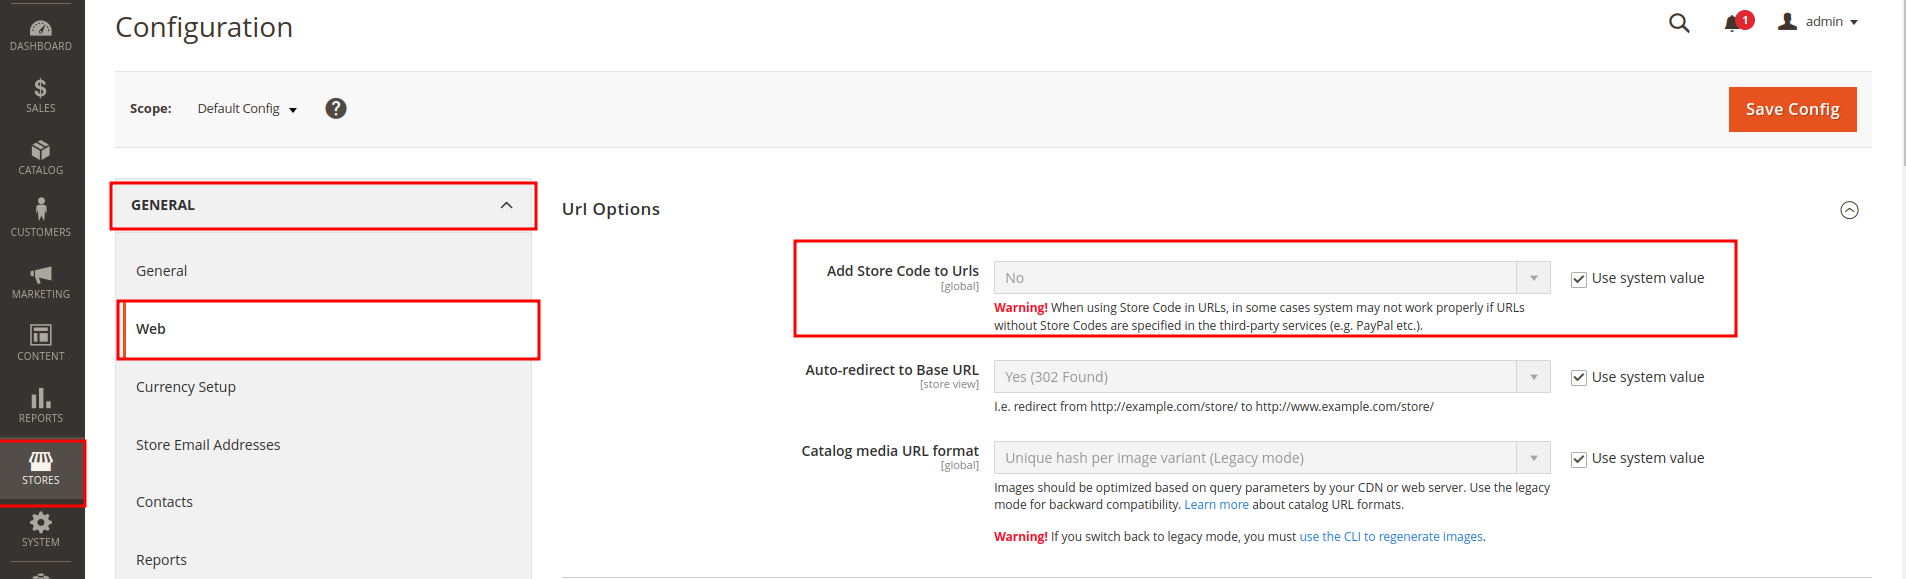
Nella barra laterale di amministrazione, vai su Negozi > Impostazioni > Configurazione > Generale > Web > Opzioni URL e imposta l' Aggiungi codice negozio agli URL su "No".
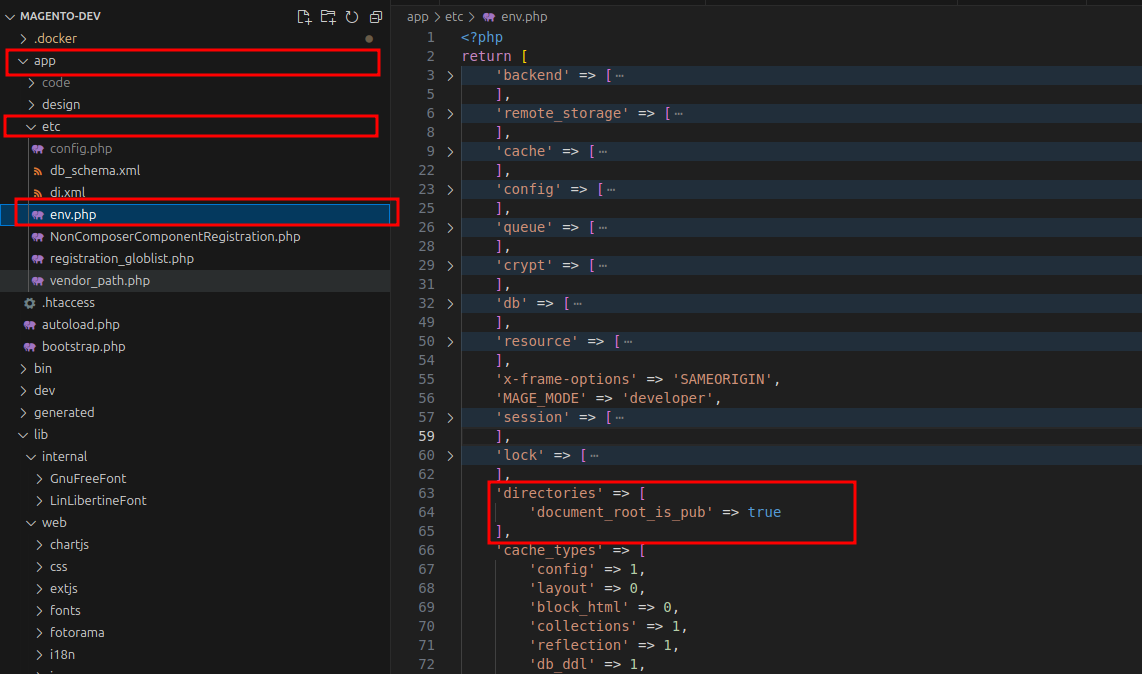
Accedi al codice sorgente del tuo sito web e apri il file app/etc/env.php. Imposta il valore di 'document_root_is_pub' su true.
Assicurati di impostare entrambi questi passaggi e continua a configurare la riscrittura degli URL per garantire che Linguise possa funzionare correttamente sul tuo sito web Magento senza problemi.
Imposta la riscrittura degli URL
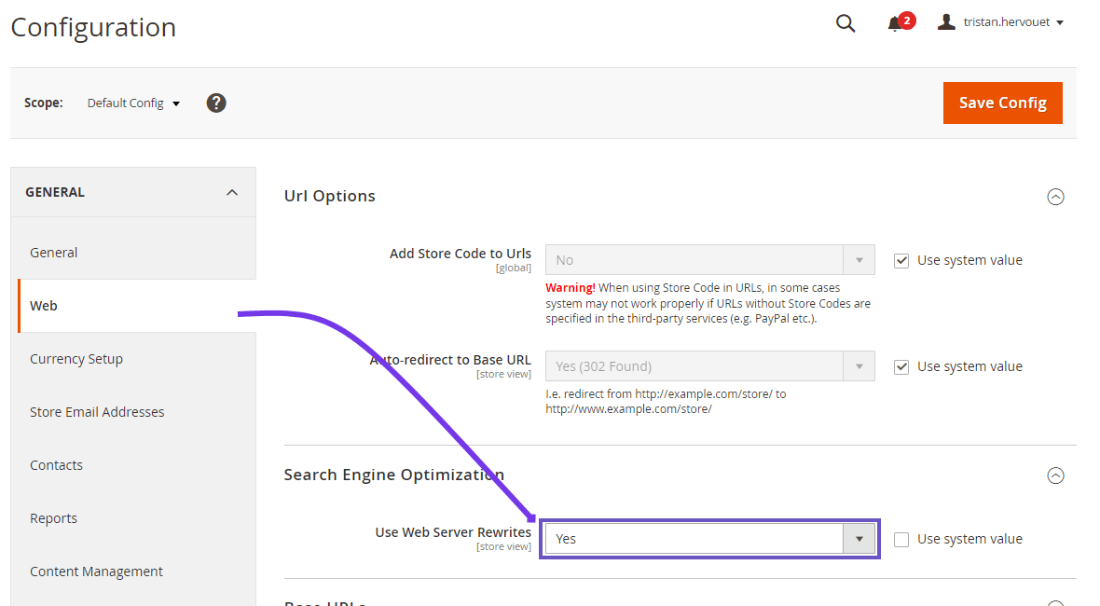
Nella barra laterale di amministrazione, vai su Negozi > Impostazioni > Configurazione > Generale > Web > Ottimizzazione per i motori di ricerca e abilita l' Usa riscrittura server web . Ulteriori informazioni sono disponibili nella ufficiale Magento documentazione
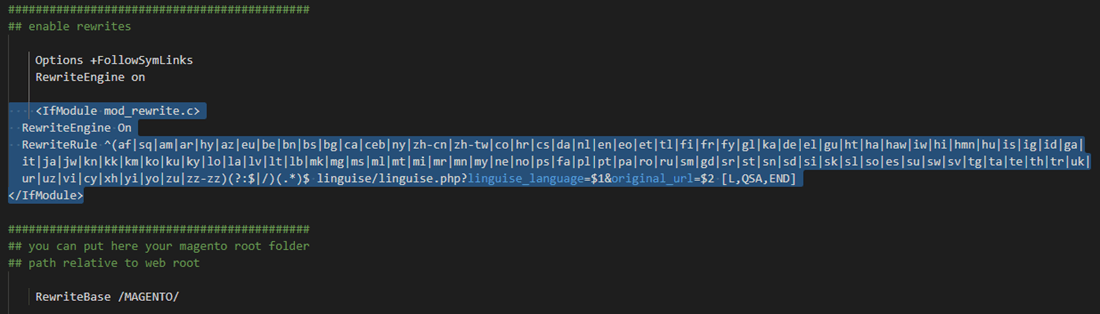
L'URL per lingua deve essere configurato nel file .htaccess. Basta copiare questo codice dopo il codice "RewriteEngine on" presente nel file .htaccess predefinito Magento 2 :
					<IfModule mod_rewrite.c>
  RewriteEngine On
  RewriteRule ^(af|sq|am|ar|hy|az|eu|be|bn|bs|bg|ca|ceb|ny|zh-cn|zh-tw|co|hr|cs|da|nl|en|eo|et|tl|fi|fr|fy|gl|ka|de|el|gu|ht|ha|haw|iw|hi|hmn|hu|is|ig|id|ga|it|ja|jw|kn|kk|km|ko|ku|ky|lo|la|lv|lt|lb|mk|mg|ms|ml|mt|mi|mr|mn|my|ne|no|ps|fa|pl|pt|pa|ro|ru|sm|gd|sr|st|sn|sd|si|sk|sl|so|es|su|sw|sv|tg|ta|te|th|tr|uk|ur|uz|vi|cy|xh|yi|yo|zu|zz-zz)(?:$|/)(.*)$ linguise/linguise.php?linguise_language=$1&original_url=$2 [L,QSA,END]
</IfModule>
Infine, il tuo file .htaccess Magento dovrebbe apparire più o meno così:
Attiva il selettore di lingua
Carica lo script Linguise JS
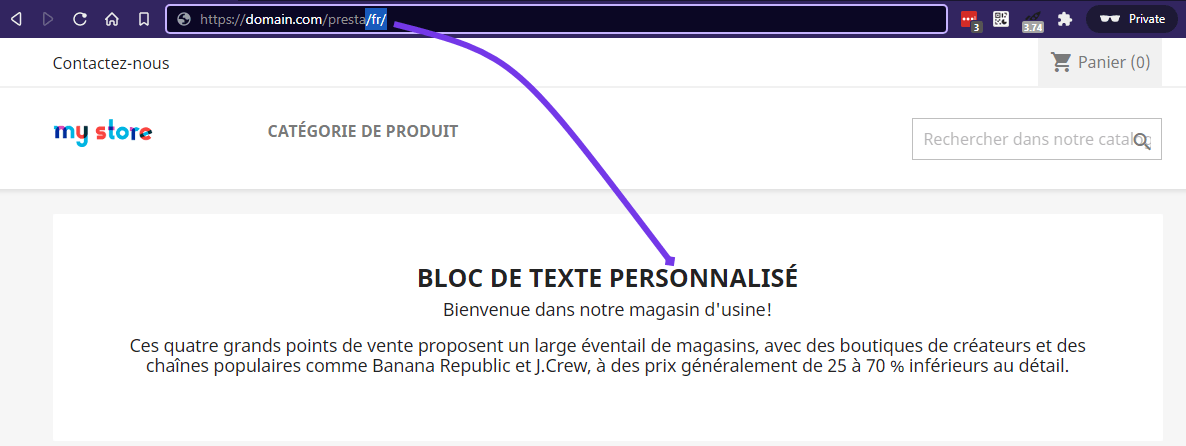
Ora puoi caricare tutte le tue pagine tradotte utilizzando l'URL, ad esempio: www.shop.com/fr/
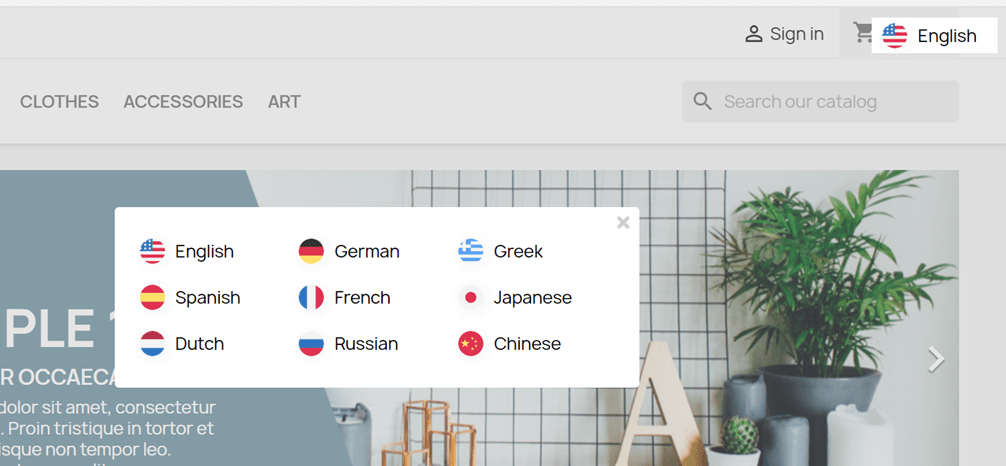
Il selettore di lingua è un popup che consente di selezionare la lingua desiderata. Per caricarlo, è necessario copiare il codice fornito alla fine della configurazione del sito web nell'intestazione della pagina HTML. Il selettore di lingua verrà quindi caricato automaticamente.
Il codice da copiare e caricare nell'intestazione del tuo sito web è disponibile nella Linguise > Il tuo dominio > Impostazioni > Scheda: Script PHP

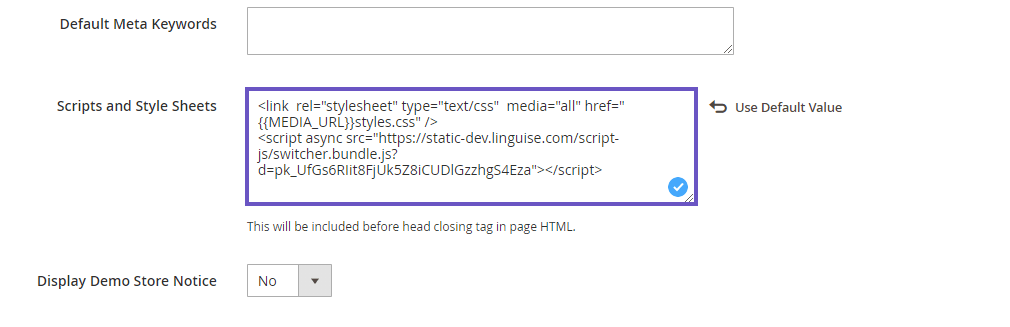
Deve essere caricato nell'intestazione della pagina. Magento 2 ti dà la possibilità di aggiungere contenuti nell'intestazione della pagina tramite la configurazione.

Nel pannello di amministrazione, vai su Contenuto > Configurazione, modifica la visualizzazione del tema predefinito del tuo negozio, quindi fai clic sulla sezione Intestazione HTML e aggiungi lo script copiato al campo Script e fogli di stile. Infine, salva la configurazione.
Installa il modulo di sicurezza Magento
A partire dalla versione 2.3.5 Magento , è necessario aggiungere un modulo di sicurezza per consentire Magento di caricare file dal dominio Linguise . Se hai familiarità con Magento , questo non sarà un problema, altrimenti ecco una guida passo passo:
- Scarica il modulo da questo link
- Decomprimi il contenuto dello zip nella tua installazione Magento nella directory app/code/
- Quindi eseguire i comandi:
					php bin/magento setup:upgrade
php bin/magento setup:static-content:deploy -f
php bin/magento cache:clean
Il selettore di lingua verrà visualizzato per impostazione predefinita in basso a destra sul tuo sito web. Puoi personalizzarlo dalla dashboard Linguise .
Nota importante per la SEO: il numero di lingue che imposti ha un impatto significativo sulla SEO. Quando imposti le lingue di traduzione, se hai un numero elevato di pagine indicizzate (>500), il motore di ricerca potrebbe impiegare molto tempo per elaborarle. Ciò potrebbe influire sulla SEO nella lingua originale. Per questo motivo, consigliamo di aggiungere inizialmente un massimo di 5 lingue e, una volta che queste sono state indicizzate, di aggiungerne altre 3 al mese.
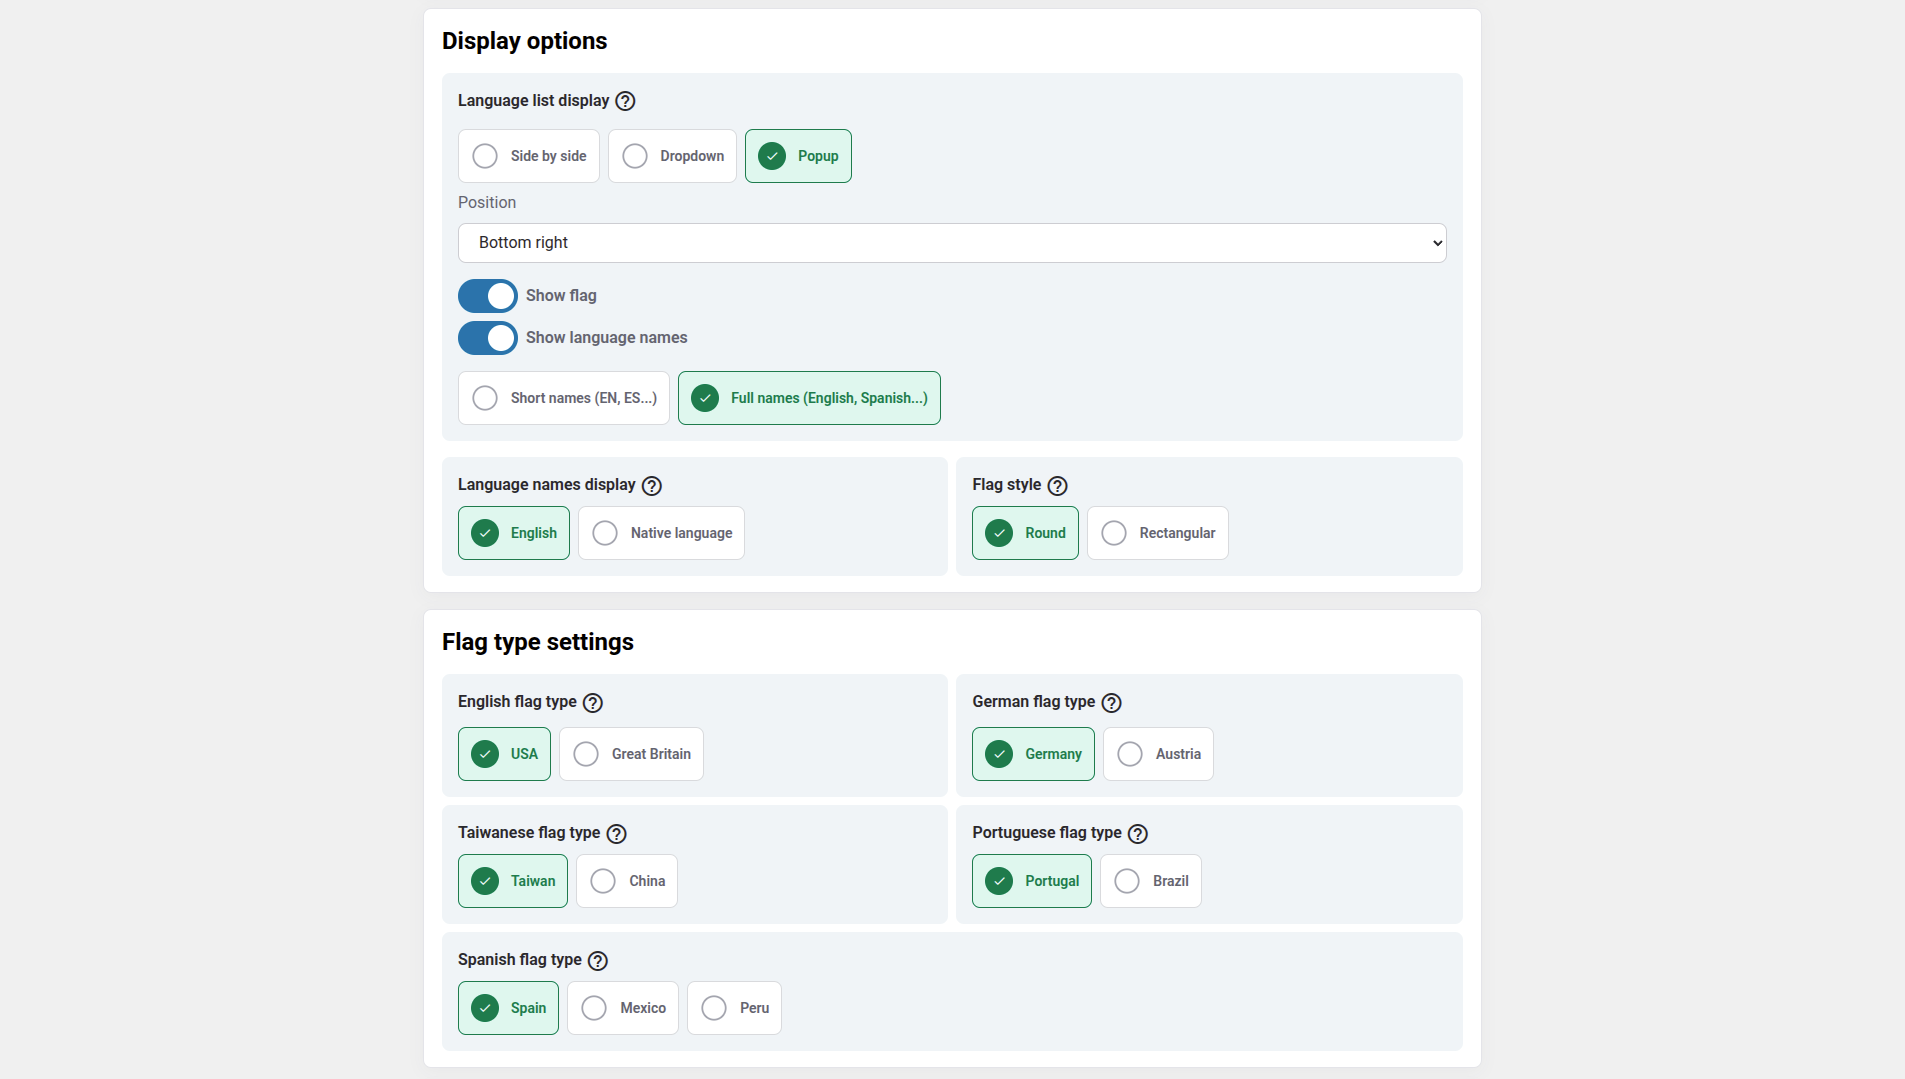
Configura il selettore della lingua
Il selettore di lingua può essere personalizzato dalla dashboard Linguise > Impostazioni > Visualizzazione delle bandiere delle lingue. Ogni modifica apportata qui verrà riflessa sul sito web.
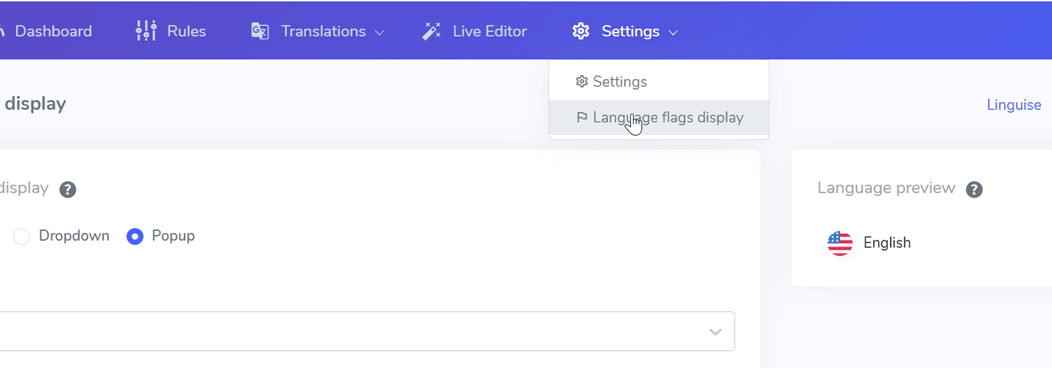
Sul lato destro dello schermo è presente l'anteprima del selettore di lingua. Ecco gli elementi che puoi impostare:
- 3 layout: affiancati, a discesa o popup
- Posizione del selettore di lingua
- Contenuto del selettore di lingua
- Nomi delle lingue in inglese o nella lingua madre
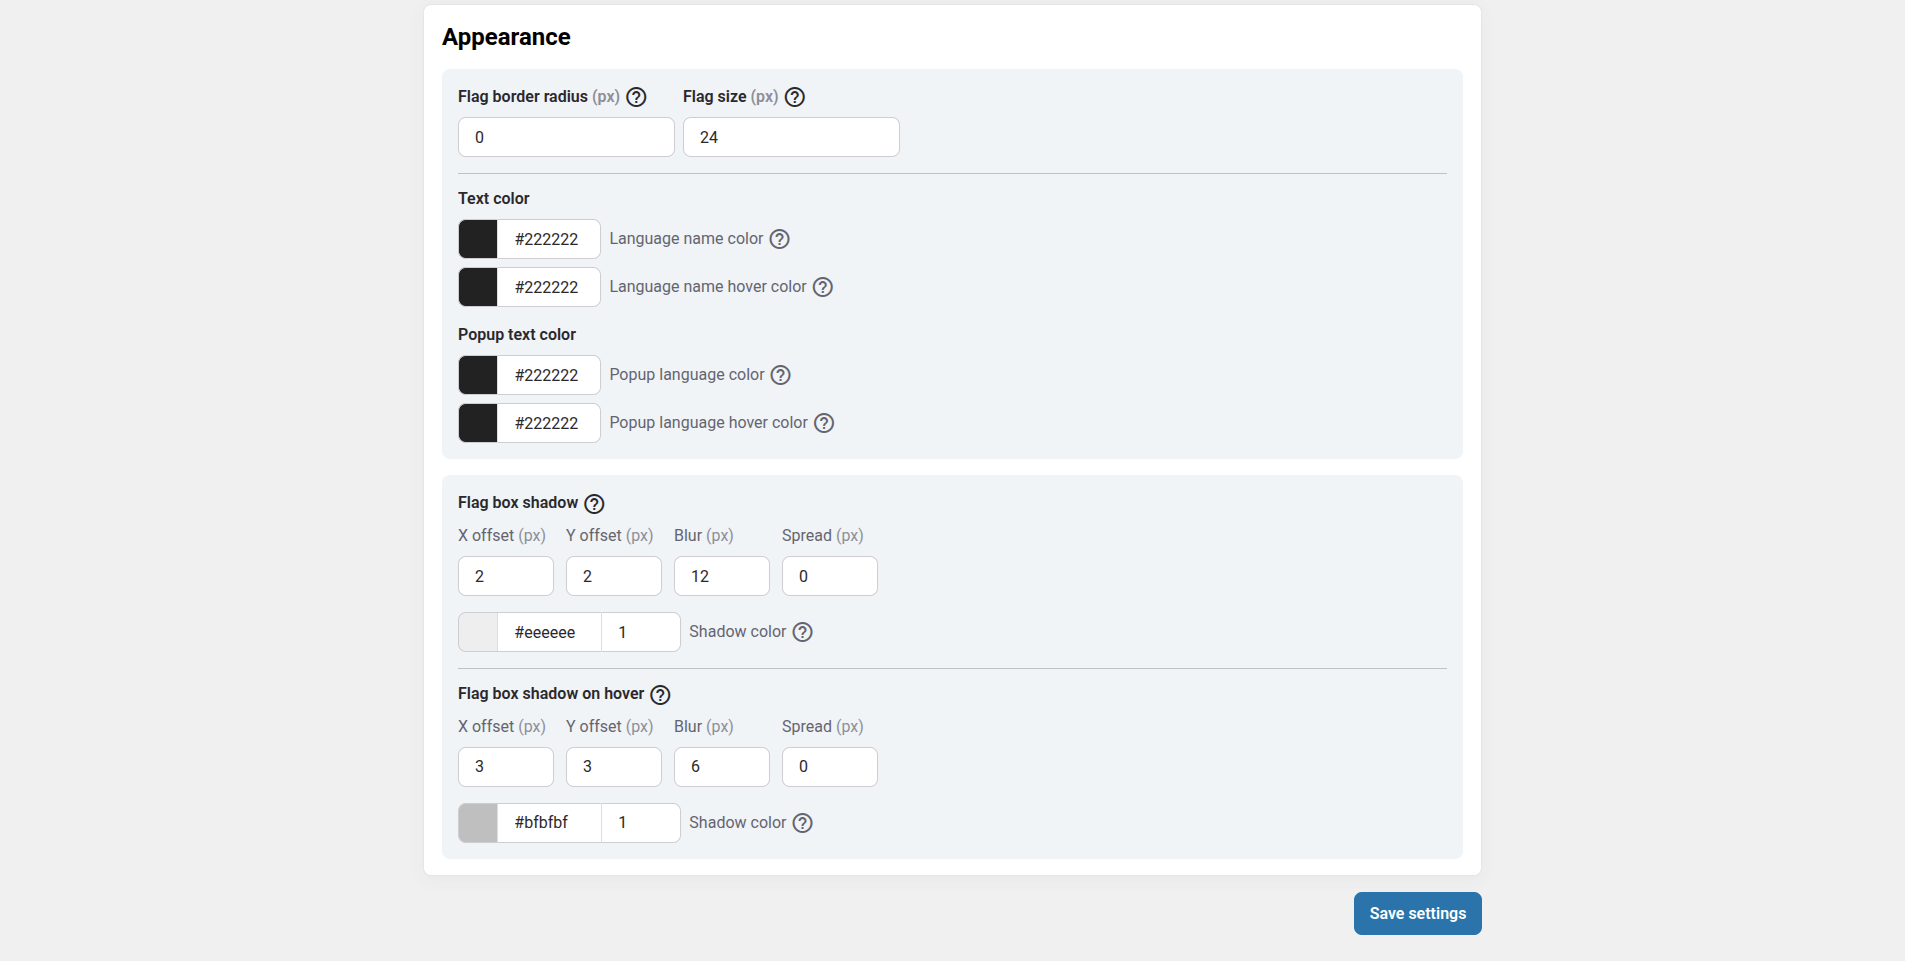
- Forme e dimensioni delle bandiere
- Colori e ombra della scatola
Carica il selettore di lingua nel contenuto Magento
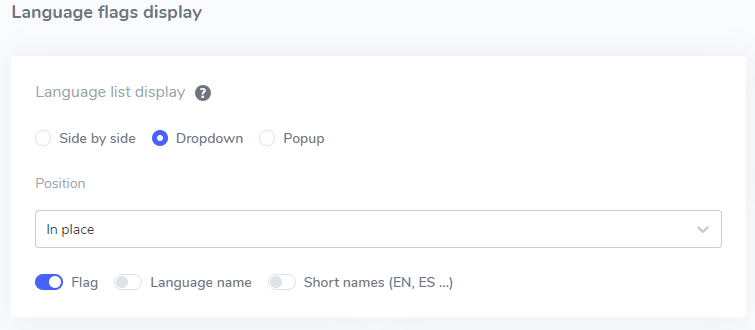
Per visualizzare il selettore della lingua in una posizione specifica all'interno del Magento , è necessario impostare la posizione su "Nel posto".
Una volta impostata la posizione nella Linguise , è possibile aggiungere lo shortcode sottostante per includerlo. Fare clic sul codice qui sotto per copiarlo negli appunti.
<div>[linguise]</div>
Una volta aggiunto, sul frontend verranno visualizzati i nomi della bandiera e della lingua nell'area HTML in cui hai aggiunto il codice.
Attiva il sistema di cache locale
In alternativa, puoi attivare un sistema di cache locale che memorizza gli URL e i relativi contenuti multilingue per servire le pagine più velocemente. La cache locale eviterà il trasferimento di dati tra il server Linguise e il server del tuo sito web. La cache viene utilizzata solo quando una pagina è già stata tradotta e non è stata aggiornata. La cache mantenuta in priorità sarà quella delle pagine multilingue più visualizzate.
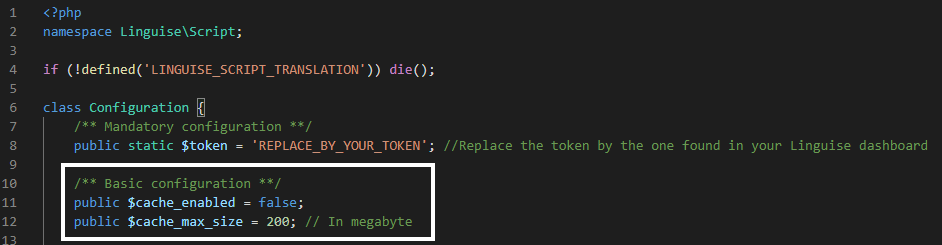
Come opzione, è possibile definire la quantità di cache memorizzata in MB. Nell'esempio seguente, la cache è attivata e la quantità di cache da conservare è 500 MB:
					    /** Basic configuration **/
    public $cache_enabled = true;
    public $cache_max_size = 500; // In megabyte