

Daftar Isi
Persyaratan teknis OpenCart
Terjemahan otomatis neural yang akan digunakan dengan OpenCart memerlukan penggunaan skrip PHP (dapat diunduh di bawah). Untuk menginstal Linguise , Anda memerlukan persyaratan berikut:
- Jalankan PHP 7+
- Apache, LiteSpeed, NGINX, server IIS
- Aktifkan penulisan ulang URL melalui konfigurasi PrestaShop
Cara menginstal terjemahan OpenCart
1. Hasilkan Kunci API untuk mengaktifkan terjemahan
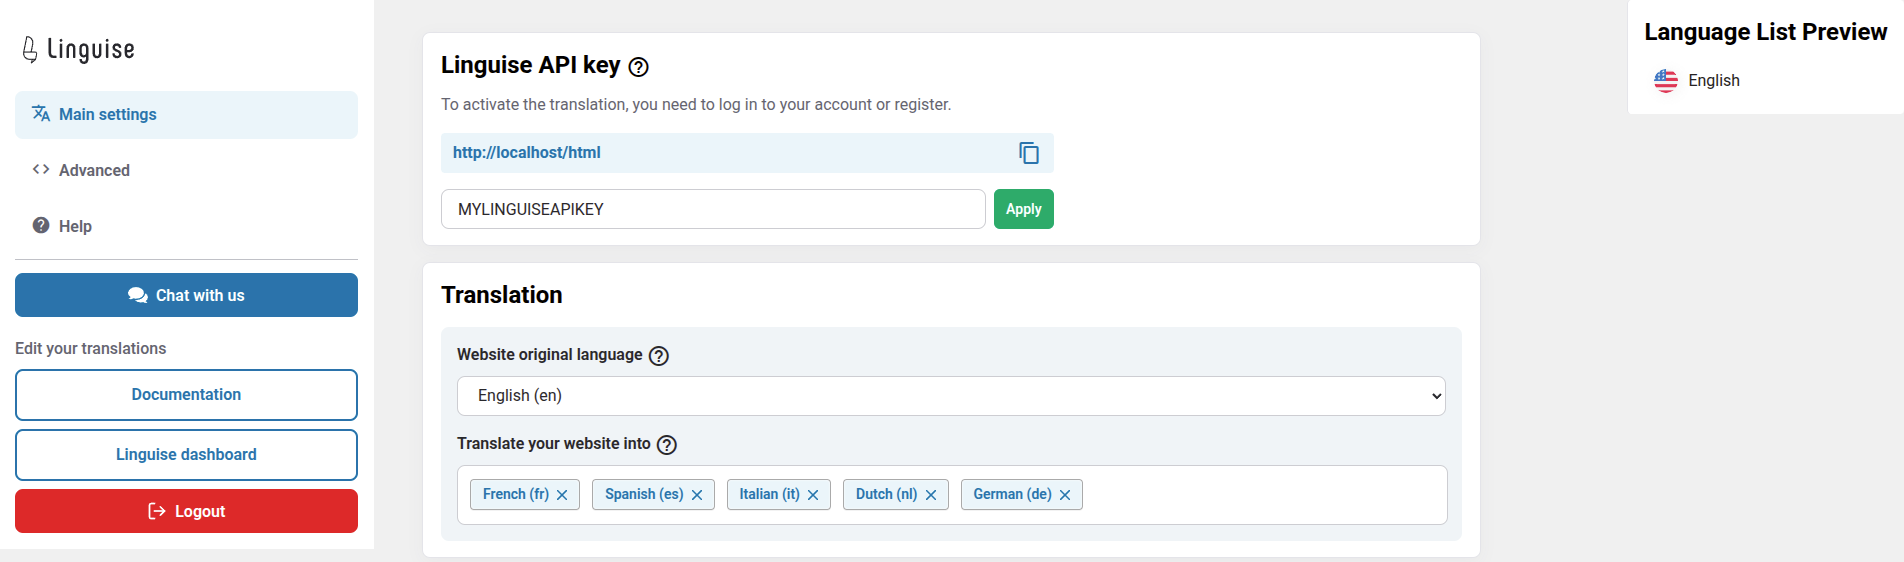
Setelah terhubung ke Linguise dasbor , Anda perlu mengatur domain baru terlebih dahulu dan menyimpan pengaturannya untuk mendapatkan Kunci API.
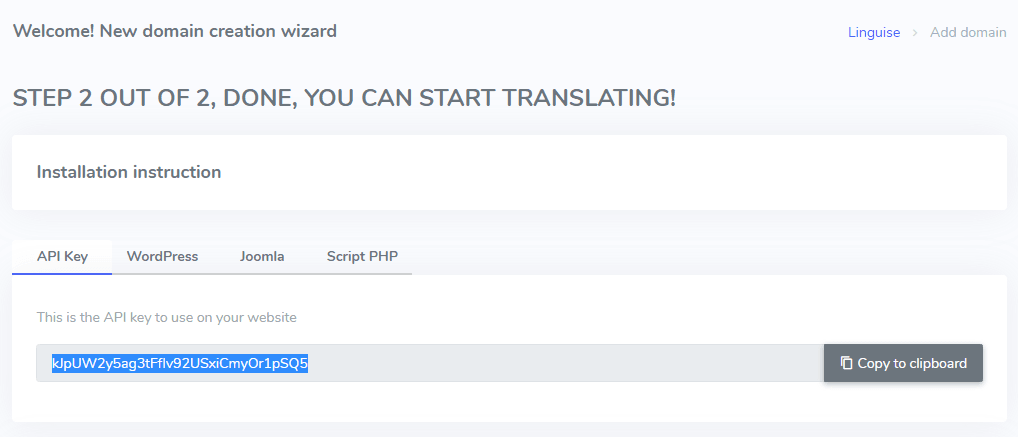
Kunci API adalah yang dibutuhkan untuk mengaktifkan terjemahan di OpenCart . Pada dasarnya, kunci API akan memeriksa bahasa apa yang diaktifkan pada domain mana dan akan memungkinkan halaman terjemahan neural untuk dihasilkan.
Salin Kunci API dan simpan di clipboard Anda.
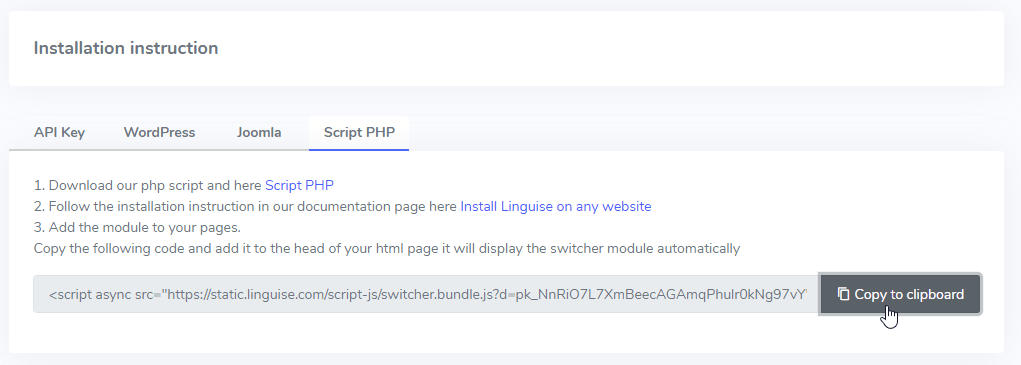
Kemudian dengan mengklik tab “Script PHP”, Anda akan mendapatkan petunjuk instalasi yang akan kita ikuti di sini secara detail.
2. Unggah dan hubungkan skrip Linguise dengan OpenCart
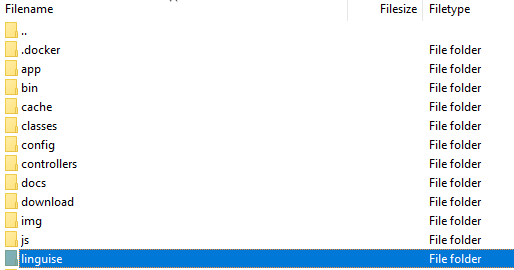
Skrip terjemahan Linguise perlu diunggah ke server Anda tempat OpenCart terinstal:
Setelah skrip diunduh, ekstrak file tersebut dan unggah ke folder utama tempat CMS diinstal.
- Pastikan letaknya di direktori utama situs web Anda (tempat OpenCart berada).
- Pastikan folder tersebut tetap menggunakan nama default “linguise”.
Bagaimana cara mengakses antarmuka Linguise Script?
Setelah menyelesaikan Linguise , Anda dapat mengakses dasbor dengan mengunjungi situs web Anda menggunakan format URL berikut
https://www.domain.com/linguiselinguise
Ubah alamat domain sesuai dengan alamat situs web Anda*
Pastikan Linguise memiliki izin baca dan tulis yang tepat*
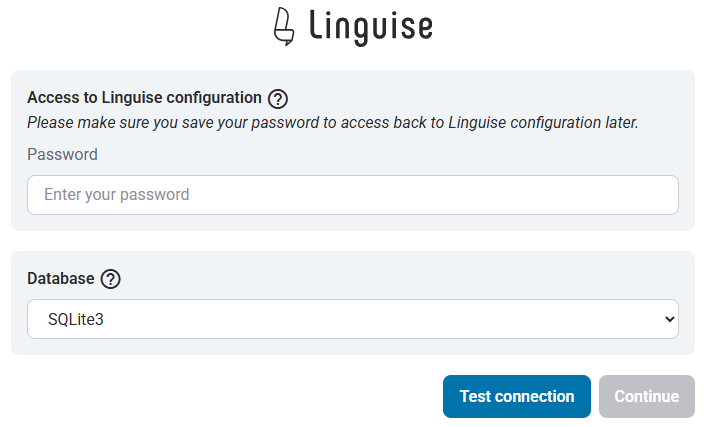
Atur Kata Sandi dan Koneksi Basis Data
Setelah Anda mengakses antarmuka skrip, Anda akan diperhadapkan dengan layar pengaturan tempat Anda dapat membuat kata sandi dan terhubung ke basis data pilihan Anda.
Anda dapat:
- Tetapkan kata sandi, yang akan diperlukan untuk akses ke antarmuka ini di masa mendatang.
- Pilih jenis basis data Anda — baik MySQL atau SQLite, tergantung pada pengaturan dan preferensi Anda.
Pengaturan awal ini memastikan akses yang aman dan memungkinkan Anda untuk mengkonfigurasi skrip sesuai dengan lingkungan Anda.
Koneksi basis data MySQL
Jika Anda memilih MySQL, antarmuka yang berbeda akan muncul dan meminta detail koneksi berikut dari Kolom Konfigurasi MySQL di bawah ini:
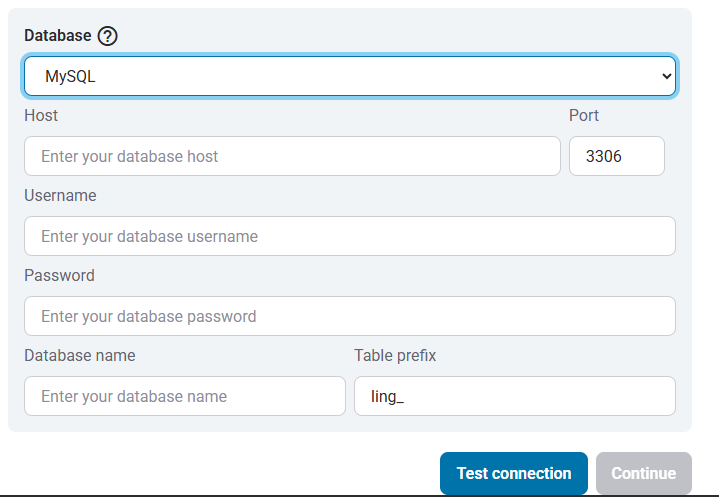
Pastikan informasi yang dimasukkan sudah benar agar koneksi ke database MySQL Anda berhasil.
MySQL vs SQLite – Apa Perbedaannya?
Baik MySQL maupun SQLite adalah sistem basis data populer yang digunakan untuk menyimpan dan mengelola data untuk situs web dan aplikasi. Namun, keduanya dirancang untuk kasus penggunaan yang berbeda dan memiliki beberapa perbedaan utama:
| Fitur | SQLite | MySQL |
|---|---|---|
| Pengaturan | Sangat mudah (diperlukan instalasi SQLite) | Membutuhkan pengaturan server |
| Penyimpanan | Berbaris satu per satu | Dikelola oleh server MySQL |
| Kinerja | Cocok untuk aplikasi skala kecil | Lebih cocok untuk sistem besar dengan lalu lintas tinggi |
| Kasus penggunaan | Aplikasi lokal, pengujian, situs kecil | Aplikasi web, e-commerce, sistem perusahaan |
Antarmuka Skrip Linguise : Pengaturan untuk platform PHP
Dasbor terjemahan Linguise , yang sebelumnya hanya tersedia untuk Joomla dan WordPress, kini memperluas dukungannya ke PHP dan platform tambahan. Pembaruan ini memungkinkan pengguna untuk mengkonfigurasi pengaturan bahasa dengan mudah—seperti opsi tampilan, gaya bendera, dan penyesuaian tampilan—langsung dari antarmuka terpadu, terlepas dari CMS atau kerangka kerja yang mereka gunakan.
Administrator dapat mengelola pengaturan Linguise dengan lebih efisien, dengan fitur-fitur yang konsisten seperti popup pemilihan bahasa, efek bayangan, dan varian pilihan bendera khusus wilayah. Dasbor mempertahankan desain yang ramah pengguna sambil menawarkan kompatibilitas yang lebih luas untuk berbagai lingkungan web.
3. Atur URL bahasa di OpenCart
Pengalihan URL biasanya diaktifkan untuk tujuan SEO di OpenCart. Pengalihan URL menggunakan file .htaccess yang tersedia di root server Anda.

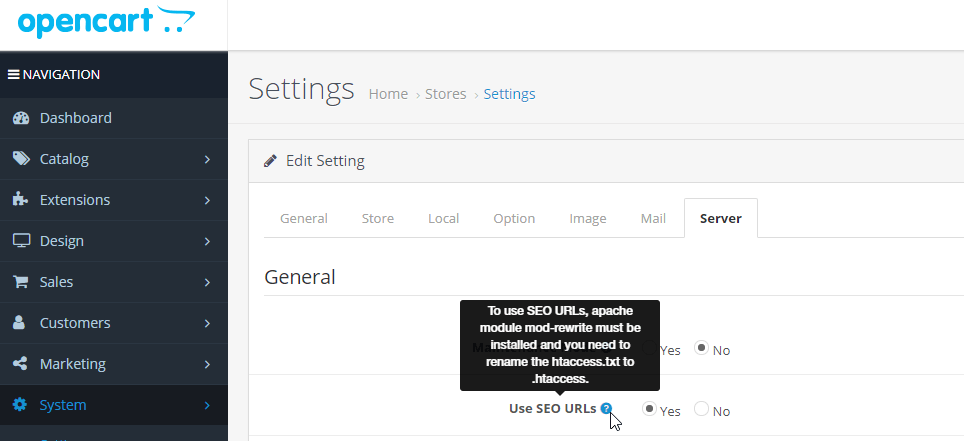
Dari OpenCart , periksa apakah penulisan ulang URL diaktifkan. Gunakan OpenCart :
Sistem > Pengaturan > Default > Server
URL berdasarkan bahasa perlu dikonfigurasi di file .htaccess. Cukup salin kode ini setelah kode “RewriteBase /” yang tersedia di file .htaccess OpenCart . bawaan
					<IfModule mod_rewrite.c>
  RewriteEngine On
  RewriteRule ^(af|sq|am|ar|hy|az|eu|be|bn|bs|bg|ca|ceb|ny|zh-cn|zh-tw|co|hr|cs|da|nl|en|eo|et|tl|fi|fr|fy|gl|ka|de|el|gu|ht|ha|haw|iw|hi|hmn|hu|is|ig|id|ga|it|ja|jw|kn|kk|km|ko|ku|ky|lo|la|lv|lt|lb|mk|mg|ms|ml|mt|mi|mr|mn|my|ne|no|ps|fa|pl|pt|pa|ro|ru|sm|gd|sr|st|sn|sd|si|sk|sl|so|es|su|sw|sv|tg|ta|te|th|tr|uk|ur|uz|vi|cy|xh|yi|yo|zu|zz-zz)(?:$|/)(.*)$ linguise/linguise.php?linguise_language=$1&original_url=$2 [L,QSA]
</IfModule>
Pastikan jalur linguise/linguisesama di server Anda, /linguise/ adalah nama default saat Anda mengekstrak skrip.
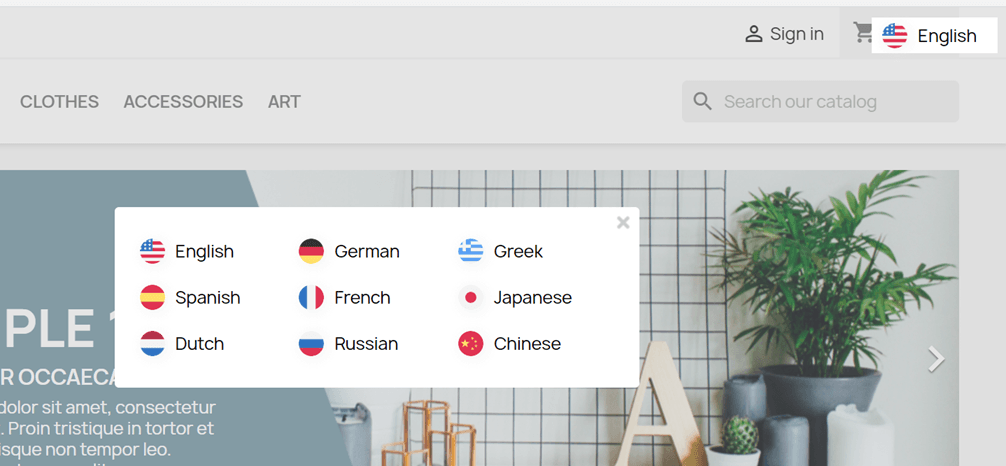
4. Aktifkan pengalih bahasa
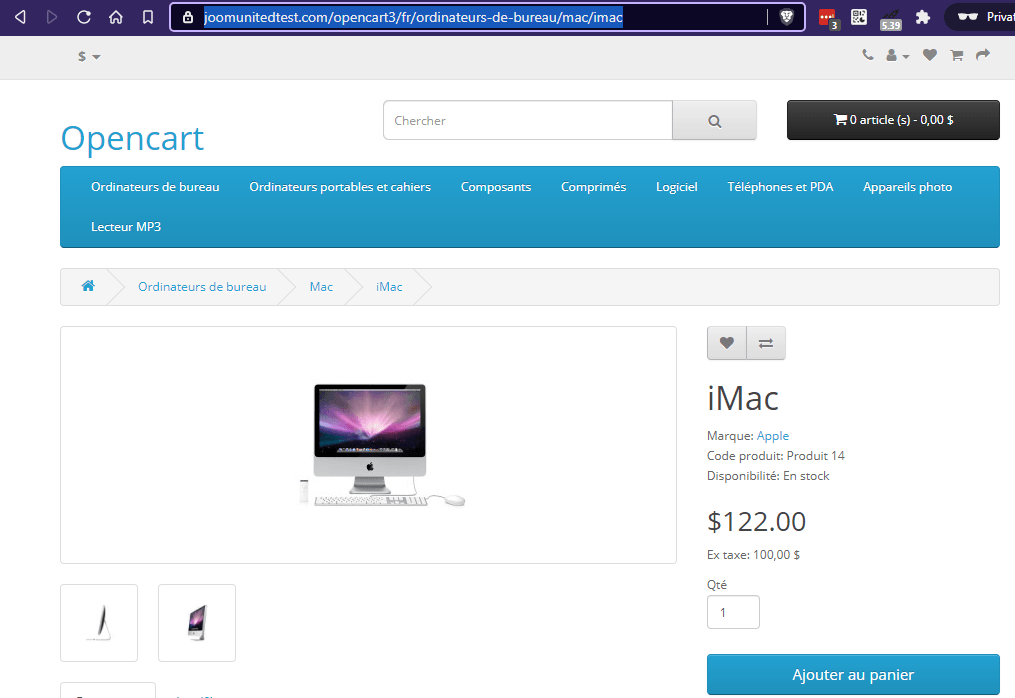
Sekarang Anda dapat memuat semua halaman terjemahan Anda menggunakan URL, misalnya: www.domain.com/fr/
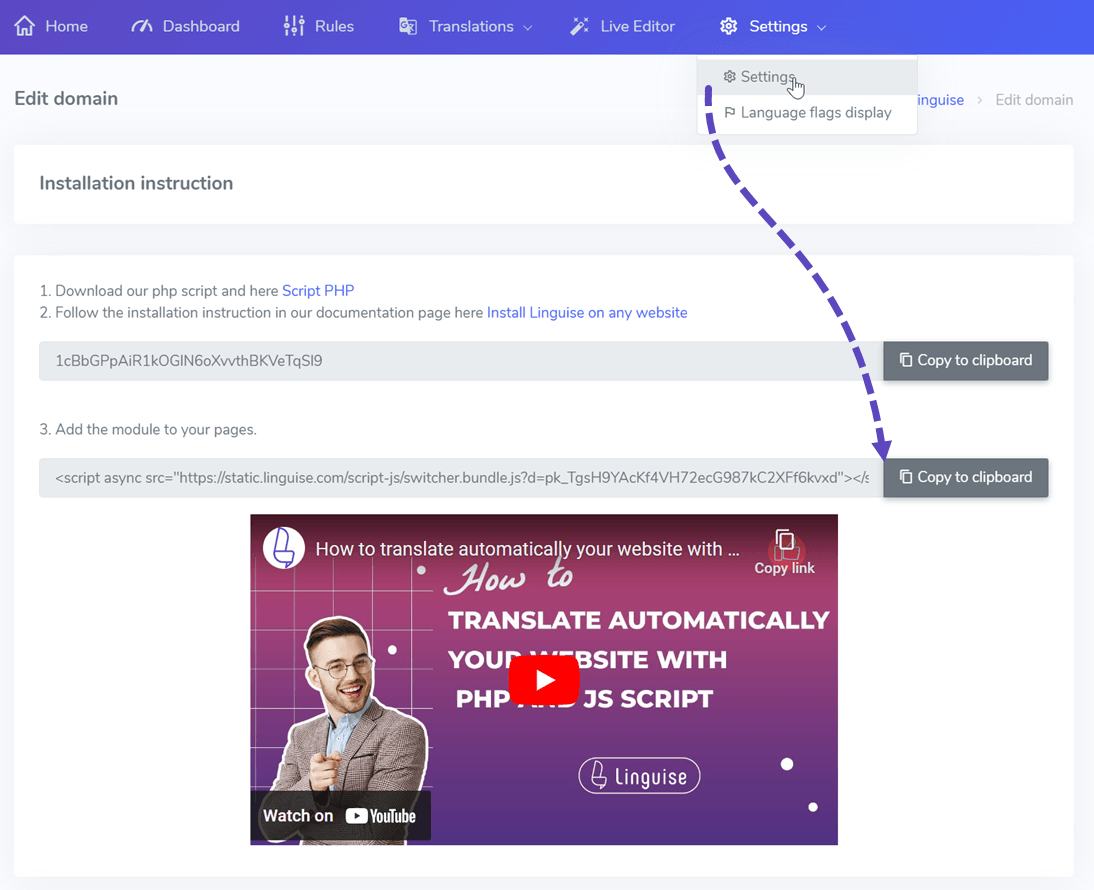
Pengalih bahasa adalah pop-up bendera untuk memilih bahasa yang Anda inginkan. Untuk memuatnya, Anda perlu menyalin tautan ke Linguise yang diberikan di OpenCart di semua halaman Anda. Pengalih bahasa bendera kemudian akan dimuat secara otomatis. Berikut tautan skrip yang dapat Anda temukan di:
linguise> Pengaturan
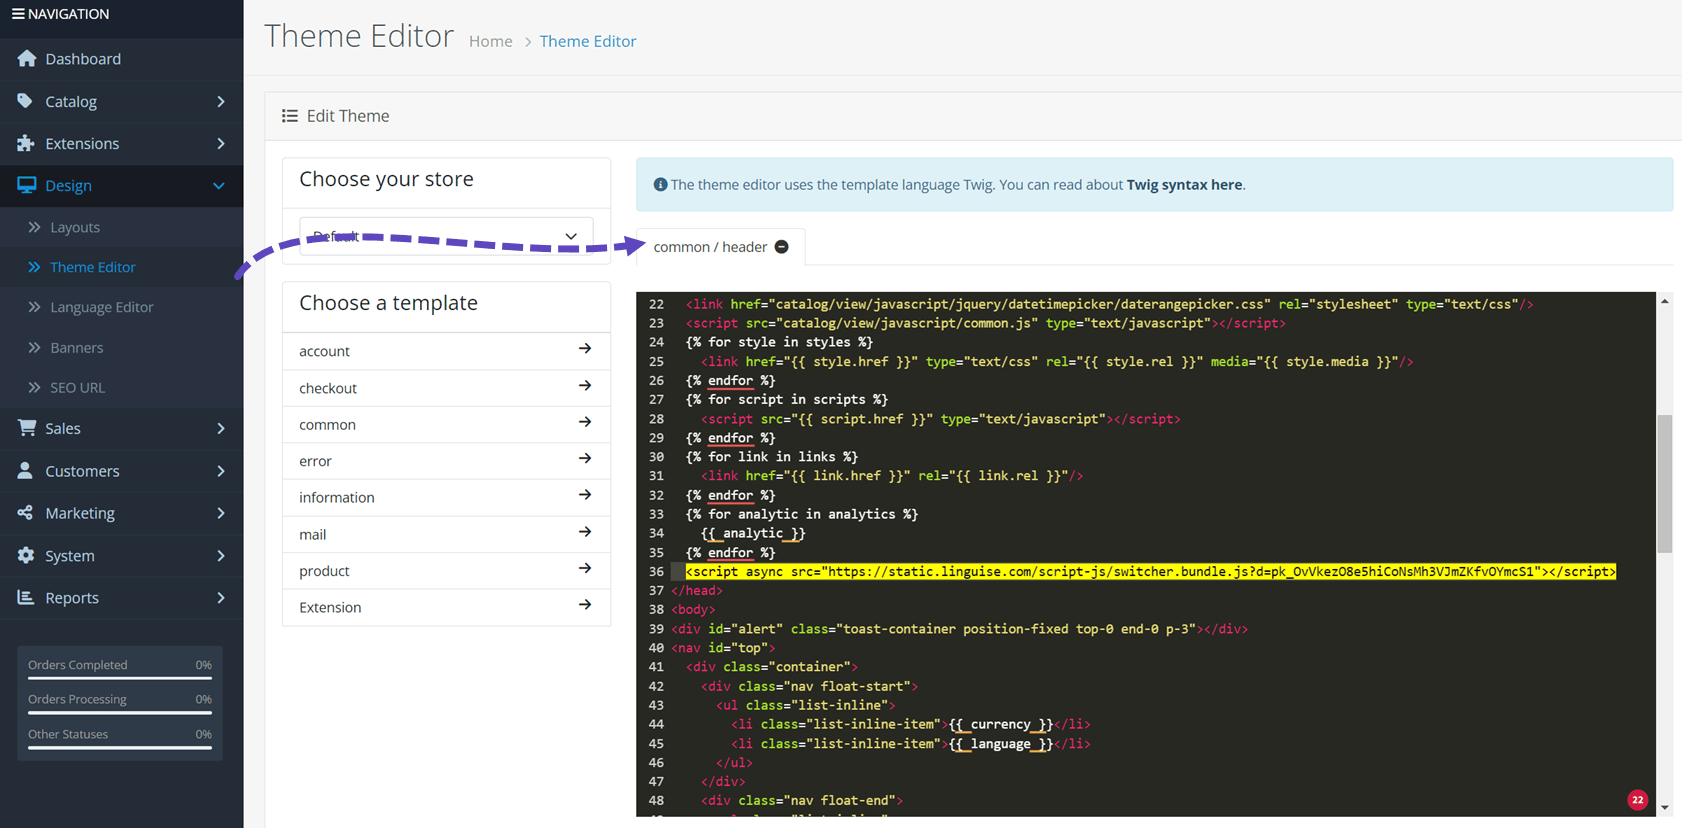
Kemudian untuk menambahkannya ke OpenCart , buka Desain > Editor tema dan edit bagian default/header dari template tersebut.
Pengalih bahasa akan ditampilkan secara default di posisi kanan atas yang mengambang di situs web Anda. Anda siap untuk menyesuaikannya dari dasbor Linguise pada langkah berikutnya.
Catatan penting SEO: Jumlah bahasa yang Anda atur sangat berpengaruh pada SEO. Saat Anda mengatur bahasa terjemahan, jika Anda memiliki banyak halaman yang terindeks (>500), mesin pencari mungkin membutuhkan waktu lama untuk memprosesnya. Hal ini dapat memengaruhi SEO Anda dalam bahasa asli. Karena itu, kami merekomendasikan untuk menambahkan maksimal 5 bahasa terlebih dahulu, kemudian setelah terindeks, Anda dapat menambahkan bahasa secara bertahap, masing-masing 3 bahasa per bulan.
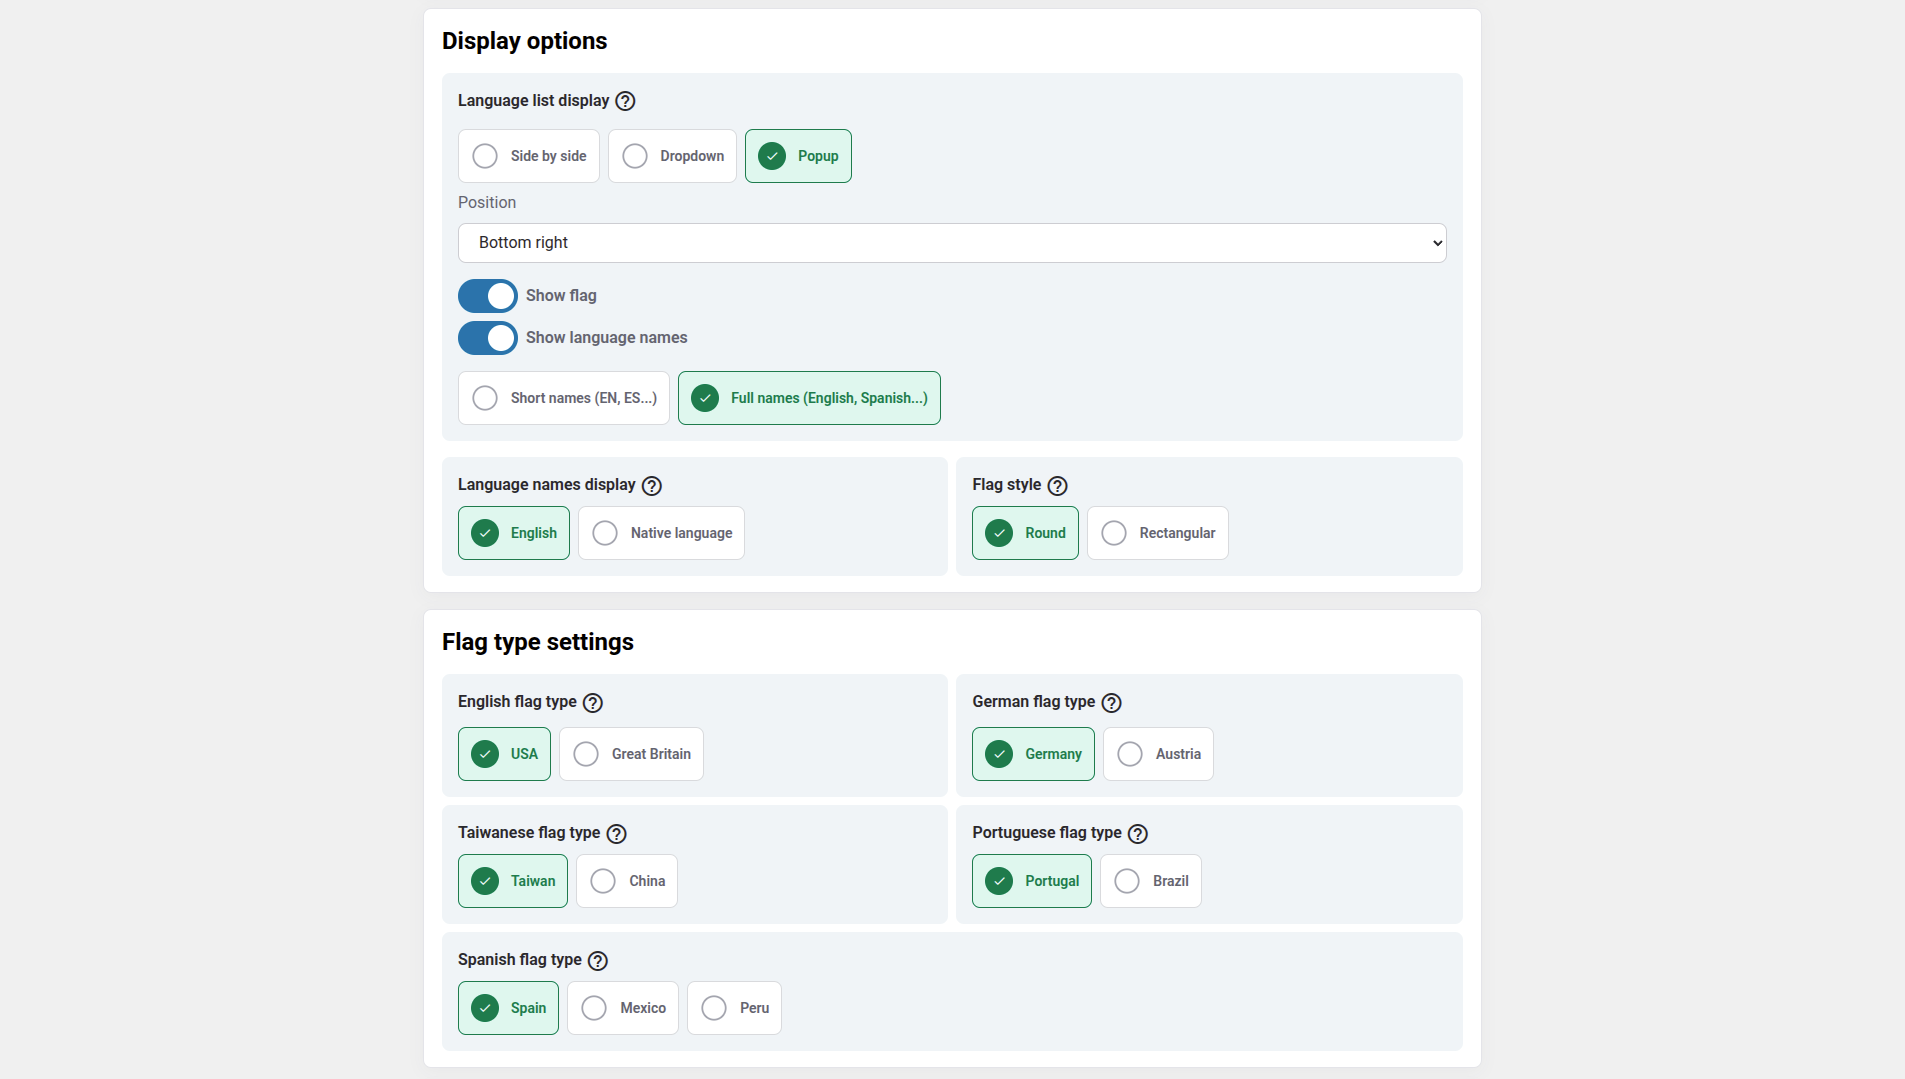
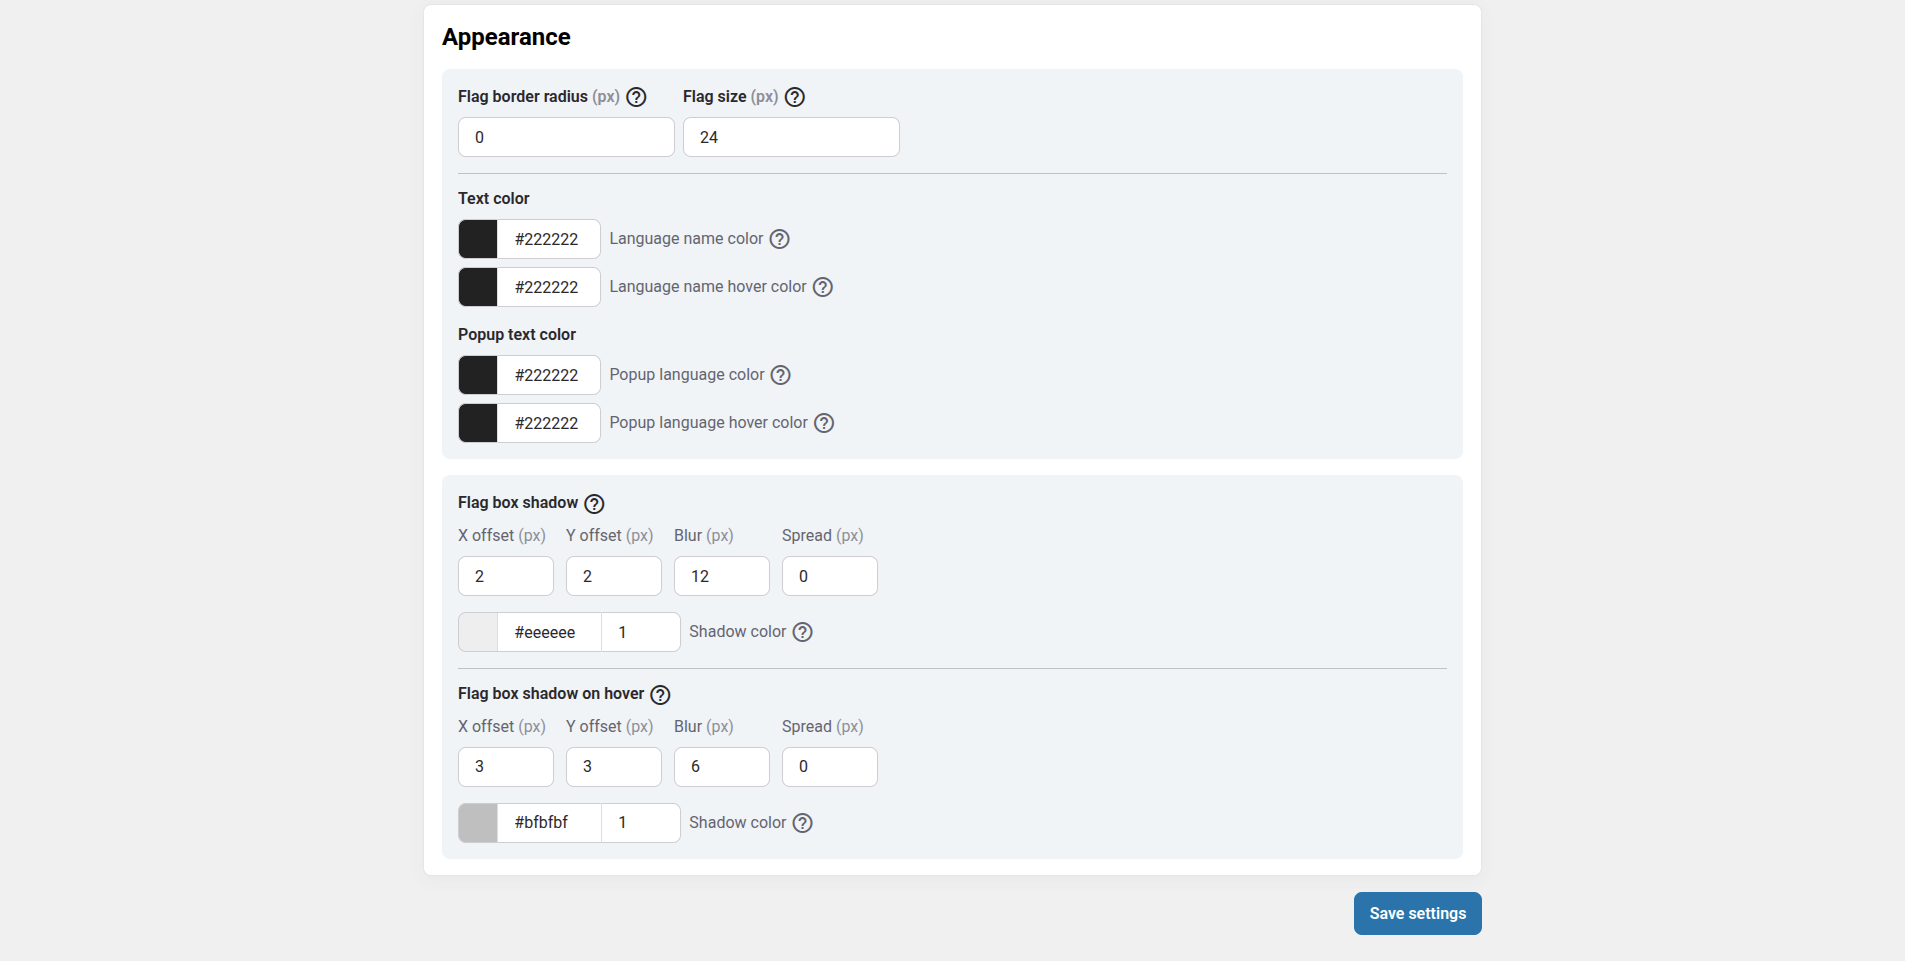
Atur pengalih bahasa
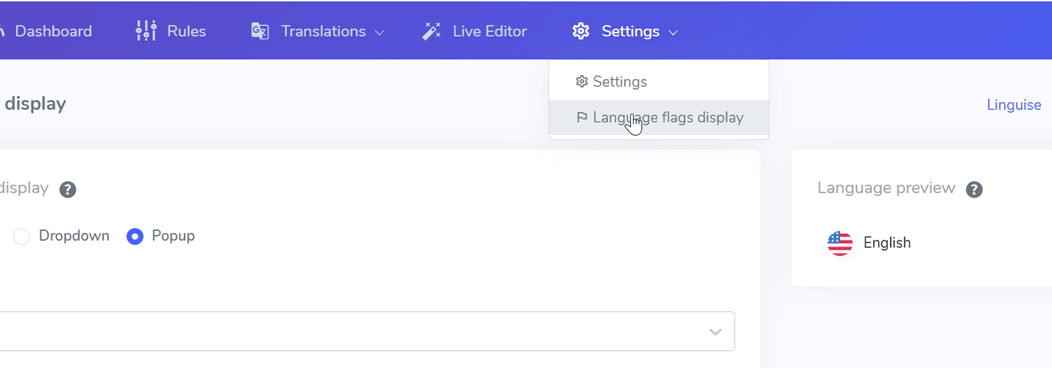
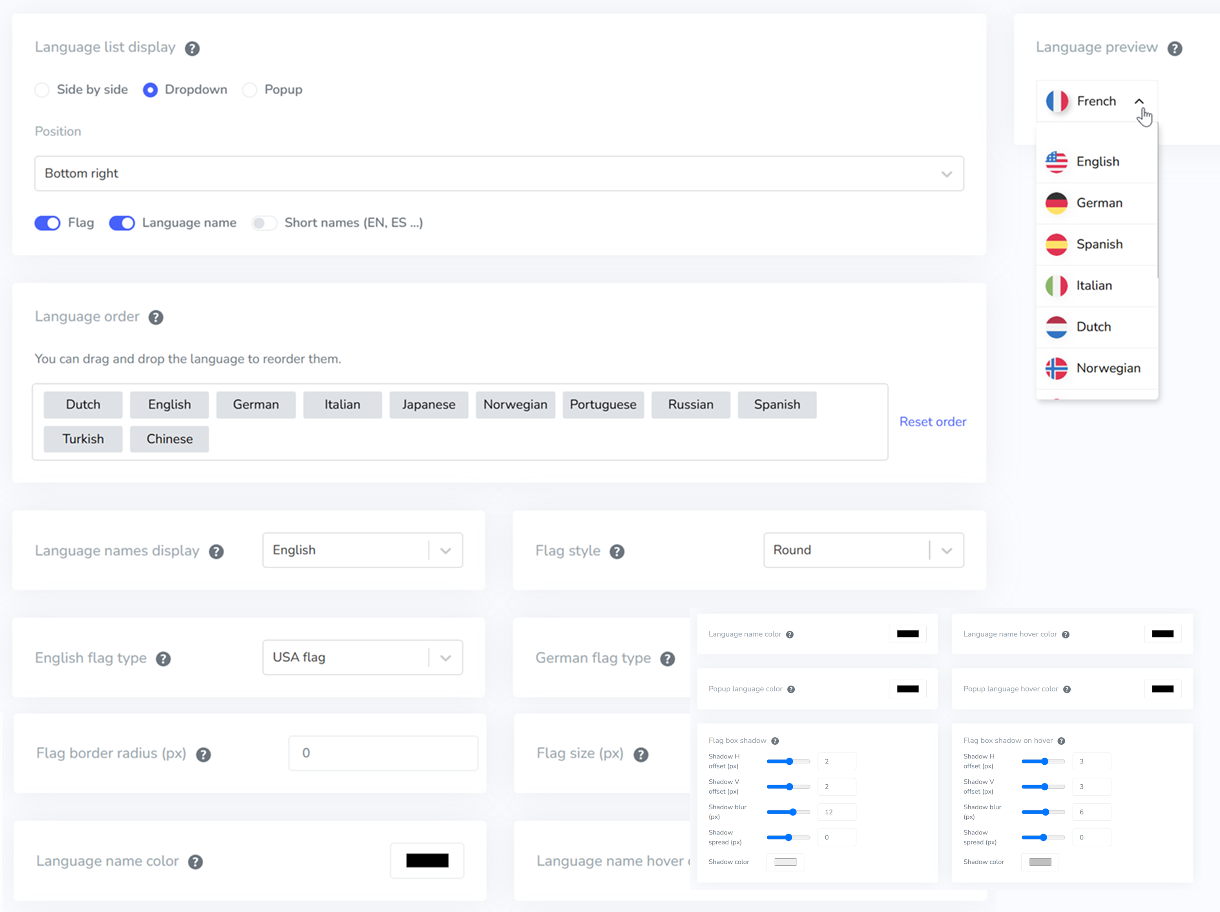
Pengalih bahasa dapat disesuaikan dari Linguise > Pengaturan > Tampilan bendera bahasa. Setiap perubahan di sini akan tercermin di situs web.
Di sisi kanan layar, Anda dapat melihat pratinjau pengalih bahasa. Berikut adalah elemen-elemen yang dapat Anda atur:
- 3 tata letak: berdampingan, tarik-turun, atau pop-up
- Posisi pemilih bahasa
- Konten pemilih bahasa
- Nama-nama bahasa dalam bahasa Inggris atau bahasa asli
- Bentuk dan ukuran bendera
- Warna dan bayangan kotak
Muat pengalih bahasa di konten OpenCart
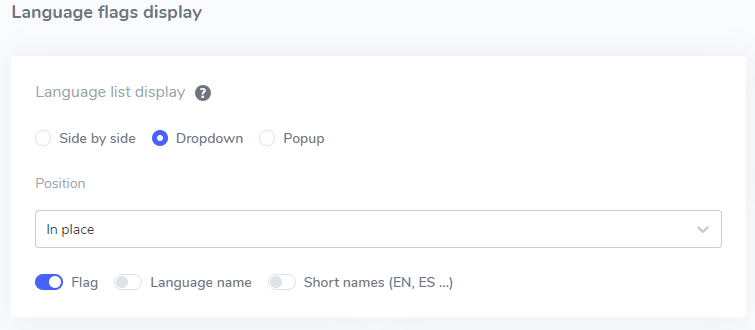
Untuk menampilkan pengalih bahasa di tempat tertentu dalam konten CMS, Anda harus mengatur posisinya sebagai “Di tempat”.
Setelah Anda mengatur posisinya di Linguise , Anda dapat menambahkan kode pendek di bawah ini untuk menyertakannya. Klik kode di bawah ini untuk menyalinnya ke clipboard Anda.
<div>[linguise]</div>
Setelah ditambahkan, di bagian frontend Anda akan melihat nama bendera dan bahasa ditampilkan di area HTML tempat Anda menambahkan kode tersebut.
Aktifkan sistem cache lokal terjemahan
Sebagai pilihan, Anda dapat mengaktifkan sistem cache lokal yang menyimpan URL dan konten multibahasa terkait untuk mempercepat penyajian halaman. Cache lokal akan menghemat transfer data antara server Linguise dan server situs web Anda. Cache hanya digunakan ketika sebuah halaman telah diterjemahkan dan belum diperbarui. Cache yang diprioritaskan adalah cache dari halaman multibahasa yang paling banyak dilihat.
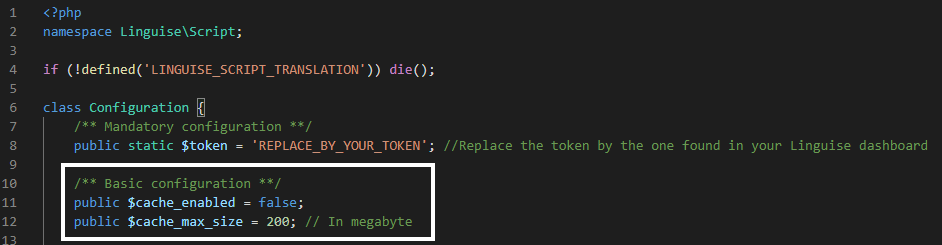
Sebagai pilihan, Anda dapat menentukan jumlah cache yang disimpan dalam MB. Pada contoh berikut, cache diaktifkan dan jumlah cache yang akan disimpan adalah 500MB:
					    /** Basic configuration **/
    public $cache_enabled = true;
    public $cache_max_size = 500; // In megabyte
Pengaturan khusus untuk CMS OpenCart
Di dalam file Configuration.php, kita juga memiliki pengaturan yang memungkinkan untuk memberikan beberapa konfigurasi khusus untuk CMS. Secara default, pengaturan ini otomatis, tetapi tim dukungan mungkin meminta Anda untuk mempersonalisasikannya agar menggunakan beberapa pengaturan khusus.
Berikut kode yang perlu ditambahkan untuk OpenCart, ini adalah nama CMS dalam huruf kecil:
					    /** Basic configuration **/
    /*
     * Update the CMS value according to your CMS
     * Available CMS are: laravel, prestashop
     */
    public static $cms = 'opencart';
Dari SQLite ke MySQL
Masih di dalam Configuration.php terdapat pengaturan untuk memaksa penggunaan MySQL sebagai pengganti SQLite, jika SQLite tidak terpasang di server.
Dalam hal ini, Anda perlu mengisi informasi MySQL di bagian ini pada file Configuration.php:
					    /** Advanced database configuration **/
    /*
     *  In case you don't want to use Sqlite, you can use MySQL
     *  To do so, you need to fill the following variables
     *  Linguise will create the tables for you
     */
    public static $db_host = '';
    public static $db_user = '';
    public static $db_password = '';
    public static $db_name = '';
    public static $db_prefix = '';
Terjemahan otomatis pada server Windows IIS
Tambahkan baris yang sesuai dengan pembuat situs web Anda di file Web.config Anda.
Baris ini harus diatur sebelum pengalihan lainnya, terutama pengalihan ke file utama PHP Anda:
<rule name="Linguise" stopProcessing="true">
<match url="^(af|sq|am|ar|hy|az|eu|be|bn|bs|bg|ca|ceb|ny|zh-cn|zh-tw|co|hr|cs|da|nl|en|eo|et|tl|fi|fr|fy|gl|ka|de|el|gu|ht|ha|haw|iw|hi|hmn|hu|is|ig|id|ga|it|ja|jw|kn|kk|km|ko|ku|ky|lo|la|lv|lt|lb|mk|mg|ms|ml|mt|mi|mr|mn|my|ne|no|ps|fa|pl|pt|pa|ro|ru|sm|gd|sr|st|sn|sd|si|sk|sl|so|es|su|sw|sv|tg|ta|te|th|tr|uk|ur|uz|vi|cy|xh|yi|yo|zu|zz-zz)(?:$|/)(.*)$" ignoreCase="false" />
<conditions logicalGrouping="MatchAll" trackAllCaptures="false" />
<action type="Rewrite" url="linguise/linguise.php?linguise_language={R:1}&original_url={R:2}" appendQueryString="true" />
</rule>
Terjemahan otomatis pada server NGINX
rewrite ^/(af|sq|am|ar|hy|az|eu|be|bn|bs|bg|ca|ceb|ny|zh-cn|zh-tw|co|hr|cs|da|nl|en|eo|et|tl|fi|fr|fy|gl|ka|de|el|gu|ht|ha|haw|iw|hi|hmn|hu|is|ig|id|ga|it|ja|jw|kn|kk|km|ko|ku|ky|lo|la|lv|lt|lb|mk|mg|ms|ml|mt|mi|mr|mn|my|ne|no|ps|fa|pl|pt|pa|ro|ru|sm|gd|sr|st|sn|sd|si|sk|sl|so|es|su|sw|sv|tg|ta|te|th|tr|uk|ur|uz|vi|cy|xh|yi|yo|zu|zz-zz)(?:$|/)(.*)$ /linguise/linguise.php?linguise_language=$1&original_url=$2 last;