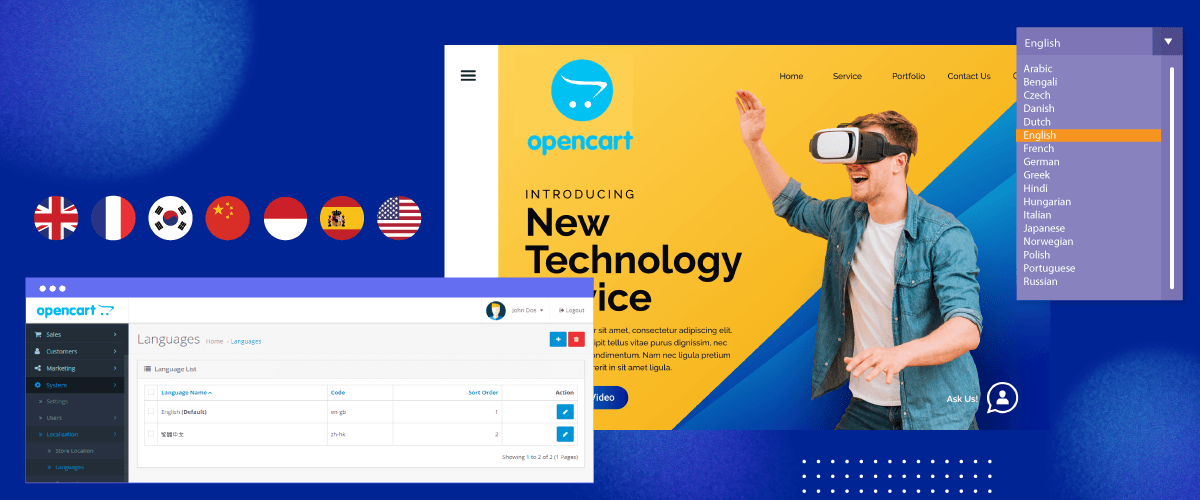
The language switcher is an important element that you must pay close attention to when creating a multilingual website because the language switcher is what users will often visit when they want to switch languages.
It is therefore important to create a language switcher that is friendly, easy to reach, and use.
So, in this article, we will discuss how to set up a language switcher for OpenCart. So, for those of you who own multilingual websites or eCommerce on OpenCart, keep reading this article until the end!
Why creating a language switcher is important for multilingual OpenCart websites?
Creating a user-friendly language switcher is critical to the success of a multilingual website. Here are the reasons why you should create a language switcher for OpenCart multilingual sites.
- Improved user experience: User-friendly language switcher provides smooth transitions between languages, making it easier for users to navigate and understand content. This improves the overall user experience, reduces frustration, and increases engagement.
- Intuitive navigation: Users should be able to easily find and use the language switcher. User-friendly design ensures that the switcher is clearly placed and uses clear, easily recognizable icons or labels, creating inspiration for users to switch between languages.
- Bounce rate reduction: User-friendly language switcher contributes to reducing bounce rate. When visitors can quickly find and select their preferred language, they are more likely to stay on the site, explore the content, and possibly convert.
- Clear communication: Language interpreters must communicate effectively with users. Clear and concise labels or symbols help communicate available language options, reduce confusion, and ensure users can make informed choices.
- SEO optimization: Search engines consider user experience while ranking websites. A well-implemented, user-friendly language switcher can have a positive impact on SEO, making your site more visible and accessible to users searching in multiple languages.
How to setup the language switcher for OpenCart?
The language-switching feature is usually provided by the website translation service. This feature can be adjusted according to the needs of what the user wants to design.
However, sometimes not all translation services provide a language-switching feature that is easy to customize and easy to use. Therefore, it is important to look for an automatic translation service that provides and is compatible with many CMS, one of which is Linguise automatic translation.
Linguise provides a flexible and easily customizable language-switching feature and is integrated with OpenCart, this translation service could be the solution for you.
Then how to set up language switcher for OpenCart or eCommerce website. Just continue reading the explanation below.
Step 1: Registering Linguise free account
To be able to use the language switcher on Linguise, of course, you need to register a Linguise account first. We also provides a 1-month free trial with various features that you can use.
Step 2: Add domain website OpenCart
The second step is to add the OpenCart website domain that you already own to the Linguise dashboard. There are several things you need to fill in, starting from.
- Account
- URLs
- Platform, select OpenCart
- Language
- Translation language
- Translate URLs
After that, you need to activate the API key and set the language URL. For a complete guide on adding a website domain you can read the install Linguise automatic translation on OpenCart or watch the video tutorial below.
Step 3: Activate language switcher
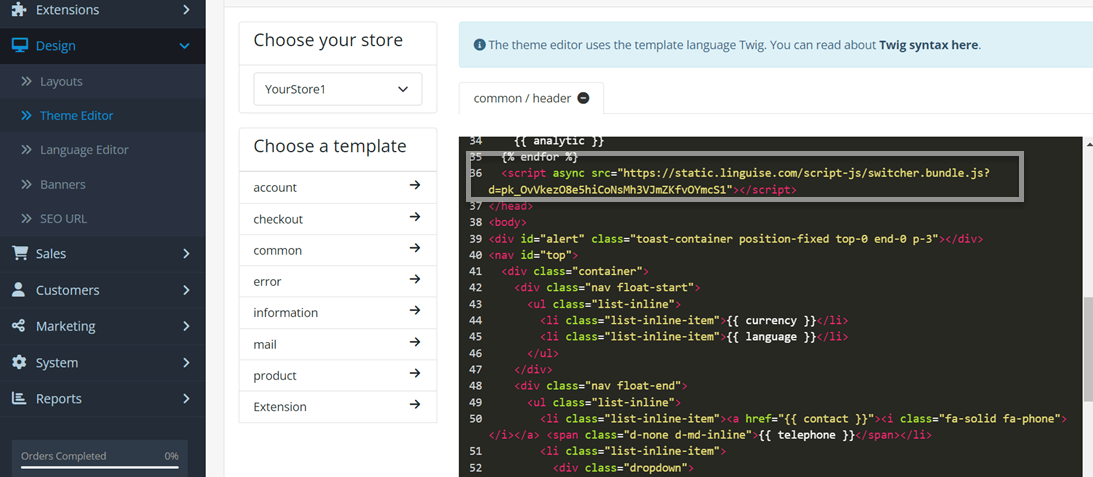
After successfully adding the OpenCart website and improving the API, it is time to activate the language switcher. There are several steps you have to follow, first, open the Linguise dashboard > Settings > copy this URL.

Once you have copied the script, you need to insert it into the theme editor of your OpenCart website. To do this, follow these steps: Go to Design > Theme Editor > Default in the OpenCart admin panel. Then, paste the script into the designated area as shown in the image below.
After that, usually, the language switcher in Opencart will automatically appear on your website page in the top right corner with a display like the following according to the language you chose when adding the website.
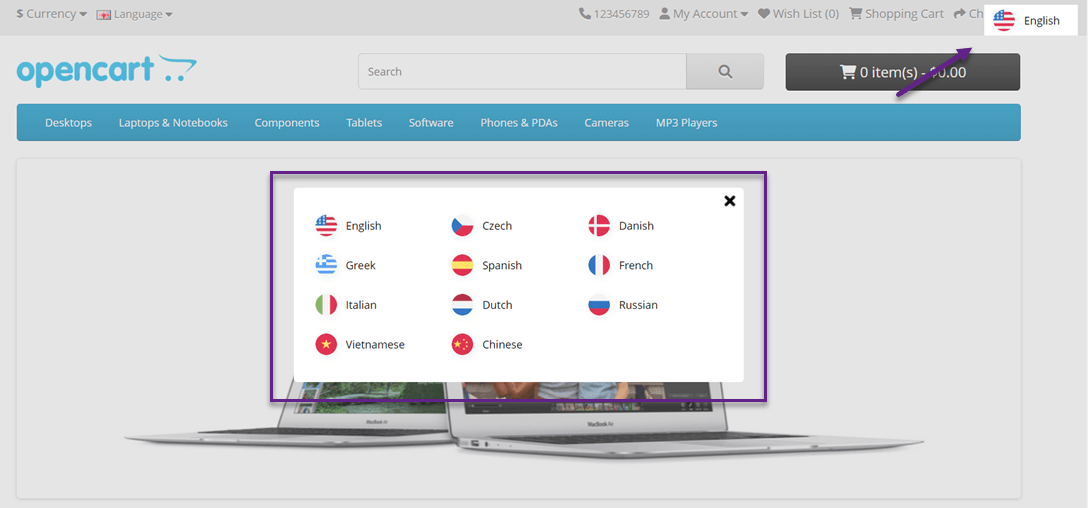
However, the language switcher display above is still the default, with Linguise you can customize this display according to your needs and desires.
Step 4: Setup main display
To set the language switcher or language flags display, you can do this via the Linguise dashboard > Settings > Language flags display.
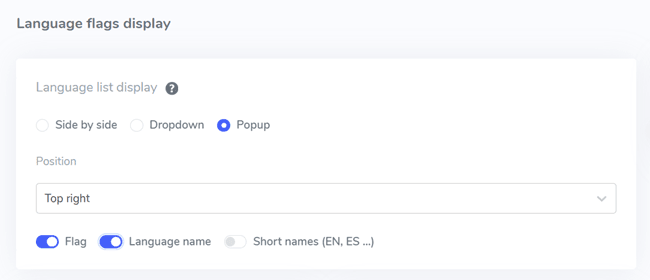
In the first setting, we will set the main display. There are several parts including:
- Flag icon shape: here you can choose from 3 available options, namely side by side, dropdown, or popup.
- Position: This position shows where your language switcher will be, you can choose from various available position options. Make sure you choose a position that is easy for visitors to find.
- Finally, you can combine flag + language name, flag + short name, or just the language name. It is recommended to use a flag along with the name of the language to make it easier for users to recognize the language.
Step 5: Set flags design
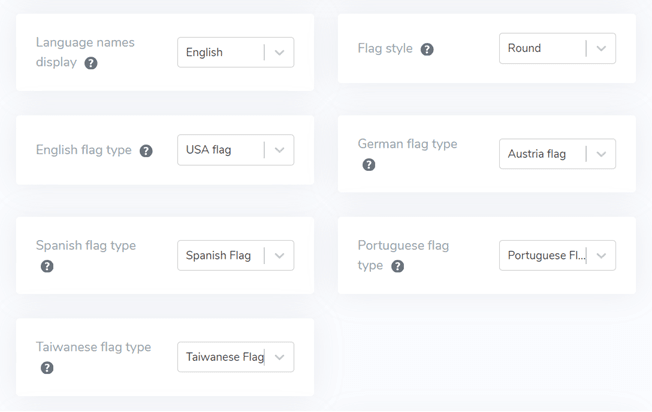
After that, under the main display, there are design settings for the flag. There are several settings in the following image.
- Display language name: you can choose a display name based on the country name or language name, for example, French or Francais.
- English flag type: this is used for languages that have more than 1 type, for example, US English or British English (the same as Spanish, Taiwanese, German, and Portuguese)
- Flag style: to set the flag icon shape, round or rectangular.
Step 6: Set the color and size of the flag
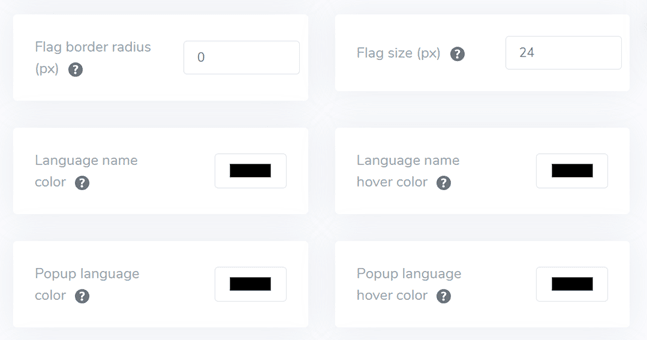
The next step after setting the flag design is setting the color, size, and several other things. In the following display, there are several settings that you can customize, such as.
- Mark border-radius: custom border radius in pixels where you use the rectangle.
- Language name color: choose the default text color for the language name.
- Popup language color: color of the language title in the popup or dropdown area.
- Flag size: flag size
- Language name hover color: mouse hover text color for the language name
- Popup language hover color: Mouse hover text color of the language title in the popup or dropdown.
Step 7: Set flag box-shadow
Finally, the settings you can do are setting up the flag box shadow, the first setting allows you to set the shadow for each flag on your website, and the next is the shadow for the language flags on mouse hover.
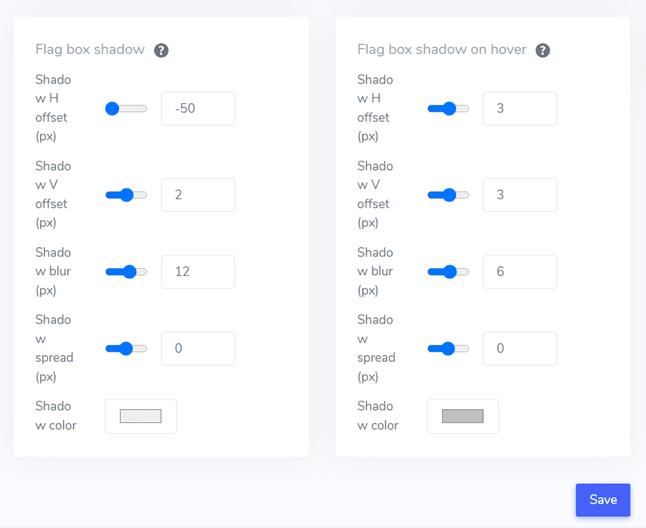
After you have adjusted all the settings, don’t forget to select Save to save the changes and now you can see what the results of the customizations that have been made look like.
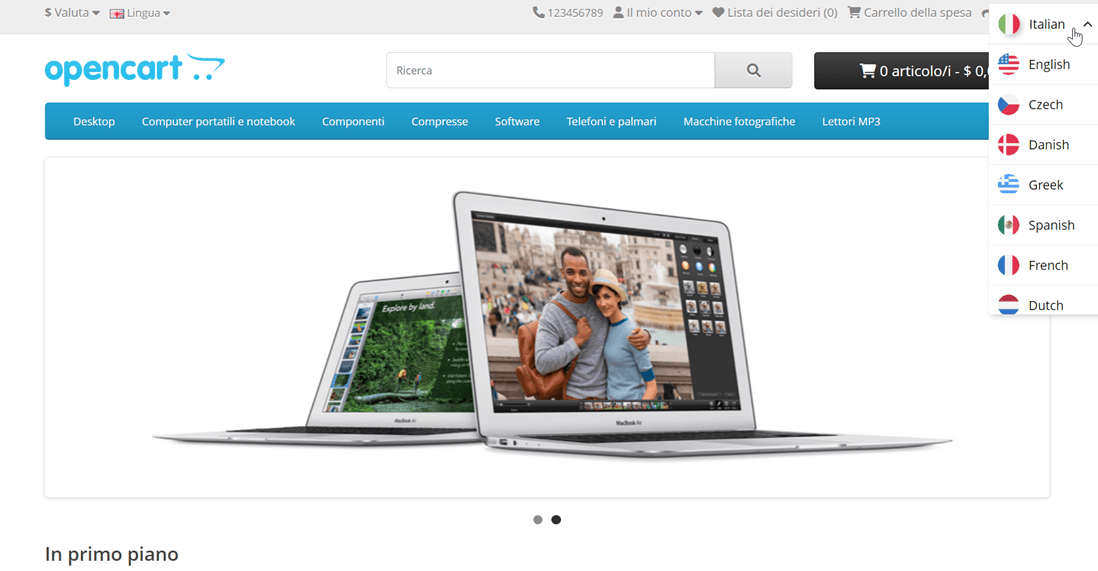
This is an example of a language switcher using a dropdown, positioned in the top right corner then using flags + language name. Apart from that, there is also a website display that is trying to be translated into Italian.
How to create a user-friendly language switcher on your OpenCart website?
After understanding how to set up a language switcher for OpenCart, now is the time for you to know how to create a friendly language switcher so that it can provide a number of more benefits for your website.
- Familiar icons or flags: use familiar language icons or flags to represent different languages. Make sure the icon or flag is visually visible and commonly understood to make sure everything is clear.
- Convenient placement: place the language-switching tool in a prominent position on your website, ideally in a consistent location across all pages. Common places include headers, footers, or navigation menus. Make sure the translation tool is clearly visible and easy to access.
- Language label on each country flag: clearly label each language option in the appropriate language. For example, use “English” for English, “Español” for Spanish, “Deutsch” for German, and so on. This helps users identify and select the desired language easily.
- Innovative design: The translation tool has an innovative design. Use familiar symbols or text to indicate language choices. For example, you can use “EN” for English and “ID” for Indonesian. Make sure the language moving tool stands out from other elements on the page, for example by using a different color or highlighting.
- Easy switching: makes it easy for users to switch to another language if the default language doesn’t match their preferences. Prevents the use of drop-down menus, flag/icon lists, or toggle buttons for language selection.
- Responsive design: Make sure the language-switching tool is responsive and works well across a variety of devices and screen sizes. Test the functionality on desktops, smartphones, and tablets to ensure a smooth experience for all users.
Conclusion: Setup the language switcher on OpenCart using Linguise
At this point you already know how to set up a language switcher for OpenCart using Linguise, creating a friendly language switcher can provide a number of benefits ranging from improving the overall user experience, and increasing user engagement, to helping improve multilingual SEO.
With Linguise, you can create friendly language switchers and full customization flags. So, what are you waiting for, register a Linguise account, an OpenCart website, and set the language switcher for a better user experience.

